­
Blog - homeandawaywithlisa
Welcome

My name is Lisa and I'm a crafty girl with wanderlust working as an engineer by day. My blog chronicles projects in my home as well as pictures and stories from my travels.

Search


Instagram

Blog Index
The journal that this archive was targeting has been deleted. Please update your configuration.
Navigation

Entries in Home (303)

Thursday
Dec152011

Curried Apple Pumpkin Soup

With winter well underway I am constantly craving soups. There is nothing like a hot bowl of soup to warm you up after coming in from the chilly weather. It makes me feel all warm and cozy inside.  

My favorite soup in the fall and winter is my Curried Apple Pumpkin Soup which I made last night for dinner. It is rich and creamy with a great slightly spicy flavor. With a baguette of crusty bread it is a perfect comfort food meal for me.

It is a pretty simple soup to make, especially if you have an immersion blender to puree the soup. Without further ado, here is the recipe.

Ingredients List
- 1/2 c. butter
- 1 bunch of leeks (2 big leeks or 3 small leeks): white part chopped
- 1 small sweet onion: chopped
- 1 Tbsp. curry powder
- 3 apples: peeled, cored and chopped 
- 2 c. pumpkin puree
- 4 c. chicken stock
- 1 pint heavy cream
- Salt and pepper to taste
- Cayenne pepper (optional)
- Pumpkin seeds (optional)

Directions
- Over a medium heat burner melt butter in a stock pot and then add leeks, onion and curry powder, cooking until nearly translucent
- Add apples and cook for a few minutes more so that apples are soft and onions are translucent
- Stir in pumpkin and chicken stock and simmer for 20 minutes until all vegetables are very soft and tender
- Remove from heat and use a blender to puree soup
- Finish by stirring in cream and adding salt and pepper to taste

Tips and Tricks
- I like to use pumpkin puree that I made from sugar pumpkins but you can also used canned pumpkin
- For blending I love using my immersion blender (best $24 I ever spent!) since I can puree it right in my stock pot which means less clean up 
- If you do use a traditional blender be sure to only fill the blender less than halfway otherwise you could potentially make a hot, exploding mess (unfortunately, I know this from personal experience)
- If you are vegetarian you can substitute vegetable stock for the chicken stock 
- For a little extra zing try adding some cayenne pepper to the soup
- I like to reserve a little cream and use it along with some pumpkin seeds to garnish the soup

Wednesday
Dec142011

To-ji Flea Market Treasures

On my recent trip to Japan I had a chance to do one of my favorite things while I am there, visit To-ji Flea Market in Kyoto.  I love poking around the market looking for interesting items and bargaining for deals.

Now that I am back in the US I am having fun incorporporating my newfound treasures into my home.

I have a display of items I have collected in my travels on a bookcase in my living room and the small abacus (¥500) I purchased made a great addition. It was pretty grungy when I got it but with a little cleaning it looks great while still retaining some of the patina it has acquired over time.

Once used by Japanese fisherman to keep fishing nets afloat, the glass fishing floats are now a popular item to see at flea markets. I bought five of them (¥400 each) at the market and had fun sifting through the box that was for sale, picking out the ones I wanted.  I love how each one uses slightly different twine and has a slightly different shade of pale turquoise.  To display them I stacked them inside a narrow glass canister that I bought at HomeGoods so it was easy to see each one individually.

My favorite find from my trip was an old milk bottle delivery box (¥2000). I love milk (As a kid, I dramatically declared "But milk is my life!" when we ran out at home one time) and the green and red printing match the colors of my kitchen. After cleaning up the delivery box I mounted on my kitchen wall and topped it with a small Japanese glass milk bottle I bought two years ago at the Osu flea market in Nagoya and a tiny Fiestaware pitcher I bought on eBay. A lot of the white paint has chipped off the delivery box so I am debating if I want to do some touch ups on the paint but for now I am happy with it. 

Monday
Dec122011

Holiday Party

With being out of town to Japan, New York and New Orleans this month I'm not going to be able to host a holiday party this year but I thought I'd share my Christmas decorations and food from my party last year.

For decorations I made table runners out of teal and white fabric. I also made pillows out of coordinating fabric and used white felt to add a snowflake motif on one of the pillows.

I kept things simple for my tree decorations with white lights, teal and silver ornament balls, pinecones that I spray painted silver and teal, and silver pipe cleaners that I twisted into spirals.

For the tables I filled vases with extra ornaments and some extra branches I trimmed from my tree. I also put some of the painted pinecones and ornaments in a wooden bowl on my serving table. 

I like to try to make some food ahead for my parties so I made three different cheese balls a few days before that just required garnishing before serving.  The lemon-parsley gougeres can be made ahead and then baked right before the guests come. I also made individual shrimp cocktails by putting a little bit of cocktail sauce in the bottom of a small glass with shrimp and a slice of lemon.  For something sweet I made honey-poached pears with marscapone drizzled with chocolate. I used whole small pears and cored them from underneath to keep the pear intact for presentation. I was happy that with so much I could make ahead everything was stress free for me at the party and I could spend my time enjoying the food with my guests instead of in the kitchen cooking.

Sunday
Dec112011

Hand Rubbed Sage Holiday Gifts

With two weeks until Christmas I've been in full swing with holiday preparations. I thought I would share a holiday gift that I made for some friends and family last year.

At the end of the summer I had huge quantities of sage left in my garden. I didn't want it to go to waste so I harvested it and dried it by hanging it upside down in a dry location using twine.

To turn the dried leaves into hand rubbed sage powder I placed the leaves in mesh colander with a bowl underneath.  Using my fingertips I rubbed the leaves through the collander which turned it into a fine, fluffy powder. 

For storage I found cute plastic containers at Target and filled them with the hand rubbed sage.

To make the labels I used a picture of sage from my garden as a background. I added "sage" and "from Lisa's garden" using word art and then printed it out of matte photo paper. I trimmed the prints into circles and attached the labels to the containers with craft glue. 

The sage containers went over well with the recipients and it turned out to be a great way to use up my over abundant supply of sage before the frost set in.

Wednesday
Dec072011

Wedding Album for Ryan & Tsukasa

At the end of this summer two of my friends from my time living in Japan, Ryan and Tsukasa, got married in Nagoya and I was honored to be able to attend and be a part of their special day. Being back in Japan this week was the first time I've been able to see them since they were married and have a chance to give them this this album I made with pictures I took at their wedding.

To create the album I started with a small album that had a chipboard cover and 4-1/2" x 6-1/2" accordian pages. I removed the rings from the covers and adhered grey patterned paper to each side using an X-acto knife to cut out the holes for the rings. I reassembled the album and tied a dark grey bow of satin ribbon to the rings.

To decorate the front cover I added a strip of white pearlescent paper and finished it with a rub-on swirl embellishment and Ryan and Tsukasa's initials in grey chipboard.

For the inside of the album I wanted to keep it simple to keep the focus on the photographs so I just added grey patterned paper to every two or three pages. After adding the pictures the album was complete.

I am so happy for Ryan and Tsukasa and I hope that they have many years of happiness and joy ahead of them. 

Monday
Dec052011

2011 Season Michigan Wolverines Tailgate Cakes

In honor of Sunday night's announcement that Michigan is going to the Sugar bowl, I thought I would share a few of my favorite cakes that I made over the course of the season for the tailgate that I am a part of.

I already posted the Ohio State cake for the final game of the regular season, but here are the rest of the 2011 home game cakes.

The picture to the left is from the Eastern Michigan game.  The tailgate theme was Far Eastern so I used fondant to cut out the Chinese characters for Michigan to put on the front of the cake. To top it off I made a fondant fortune cookie and used a food write to write "Michigan will beat Eastern" as the fortune.

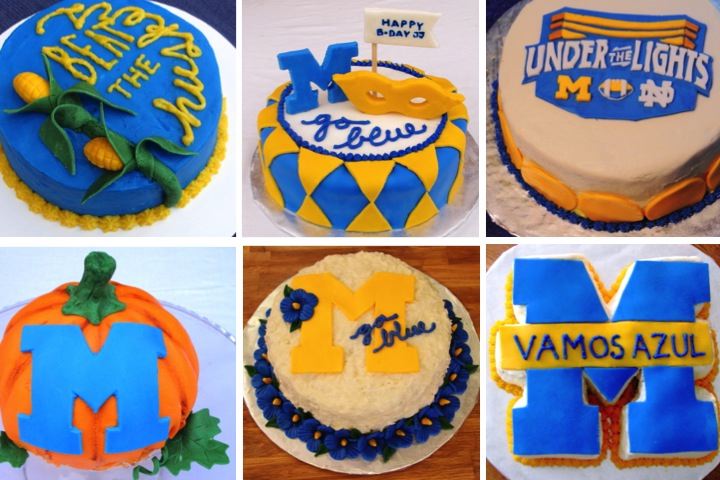
For the collage below I'll describe the cakes top to bottom, left to right.  For the Nebraska game I decorated the cake around their mascot by making corn stalks out of fondant and writing "Beat the Huskers" across the top of the cake.

The Minnesota tailgate had a Mardi Gras theme so I made a doberge cake and decorated it with a harlequin pattern and a mask.

The first ever homegame at Michigan Stadium played at night was the Notre Dame game and there was a lot of memorabilia being sold with the "Under the Lights" logo emblazoned on it.  I thought the logo looked neat and recreated it out of fondant for the top of the blue velvet cake.

The Purdue game was on Halloween weekend so I made a pumpkin cake shaped like a pumpkin. I used some brown edible glitter to give the cake some dimension, made the stem and leaves out of green fondant and finished it off with a big block M on the front. 

For the Luau themed tailgate for the Western Michigan game I made a pineapple cake with coconut cream cheese icing. I completed the cake with a block M on the top and a border of blue hibiscus flowers made of fondant.

The San Diego State game had a Mexican theme so I cut my cake into a block M shape and wrote "Vamos Azul" across the banner (Go Blue in Spanish).  

Making the tailgate cakes is a lot of fun for me and gives me a nice excuse to bake.  I'm sad that the regular season is over but I am excited about heading down to New Orleans for the Sugar Bowl. Go Blue!

Friday
Dec022011

At Home in the Kandacho Corporus

Everytime I come back to Japan I take a walk by my old apartment building, the Kandacho Corporus.  It's a non-descript greyish-brown apartment building that could be anywhere but it was the place that I called home for a little over a year. It had a great location close to a train station, shops and restaurants and was very spacious for a Japanese apartment.

I didn't ship much over since I wanted to buy things in Japan and have space in my shipment home to bring everything back. I had fun furnishing my place and it ended up being an ecclectic mix of Japanese and Western that worked well for me.

For my living room I bought two couches at Nittori (kind of like a Japanese Ikea) and found some Japanese chests at recycle shops (Japanese second hand stores for home goods).  I hung up some of my travel photos and displayed some of the items I picked up during my travels to make things homey.

I had a galley kitchen without too much storage space so I bought an open shelf storage unit for easy access to things that I used often.  For storing food items I picked up the large jars at recycle shops and the small ones at a hyaku-en store (Japanese version of a Dollar Store).  I bought my dishes in Seto, which is a Japanese town famous for ceramics and pottery. One of my favorite things in my whole apartment was my Nisshin Flour Milling sign which I picked up at the To-ji flea market in Kyoto. I have it hanging in my kitchen back in the US now.


I didn't want to buy a Western mattress so I decided to try sleeping on a Japanese futon and loved it.  I read before bed most nights so when I found this little table at a flea market in Kakuozan I knew it would be perfect for a "futon-side" table.

Since I had extra space of course I had to have a craft room.  I bought the table at a recycle shop for ¥1000 (about $10 at the time) and it was great for spreading out lots of projects.  I had started collecting old globes when I would stumble across them in the US so when I found these two old Japanese globes I had to have them.

Back home in the US, I have several of the items from my Japanese apartment incorporated throughout my house.  They are full of great memories of the time I spent at the Kandacho Corporus and seeing them everyday brings a smile to my face.

Tuesday
Nov292011

Baby Quilt for Vanessa's Little Man

When my roommate from grad school, Vanessa, had her little man I wanted to make a baby quilt for him.  Her nursery items were full of bright, vibrant colors and when I found the Punctuation Alpha Card fabric by Moda I knew it would be perfect.  

For the center of the quilt I cut out each alpha block and then pieced the blocks together with black sashing. I assembled 'D' - 'W' into a rectangle, made a strip of 'A' - 'C' and 'X' - 'Z' and then set the three pieces aside.

For the outside border of the quilt I went through my fabric stash and pulled out a bunch of bright scraps in rainbow colors. I cut each scrap to 6-1/2" and then cut strips in random widths from 1" to 2-1/2".  I arranged the strips in a random order and sewed them together. I then added a section of the border to the top of the 'A' - 'C' strip, the bottom of the 'X' - 'Z' strip, and both sides of the 'D' - 'W' rectangle.

To make the corners I made four rectangles of the colored strips 11" x 13", two with the strips going vertically and two with the strips going horizontally.  I then made a diagonal cut across each of the blocks and then reassembled the vertical strip and horizonal strip triangles to make the mitered corners.

To finish the quilt top I sewed a mitered corner block to each side of the 'A' - 'C' and 'X' - 'Z' strips and assembed the 'A' - 'C' strip,  'D' - 'W' rectangle and 'X' - 'Z' to each other.  I basted the quilt top to the batting with an alphabet print for the quilt back and then quilted it with a straight pattern.  I completed the quilt by adding black binding around the edges.

Vanessa loved the quilt and it really warmed my heart to see it in her son's nursery when I visited her in DC this past summer.  It is far from a perfect quilt with some uneven seams and stiches but it was made with love for a very special little man and his wonderful mom. 

Monday
Nov282011

Kitchen Island for Mom

As I am getting in the swing of planning out my Christmas gifts for this year I thought I would share the gift I made for my mom for her birthday/Christmas gift last year.  She and her husband were in the final stages of remodeling their kitchen and the last item they needed was a kitchen island so I decided to build it for them as a gift.  

I started by repurposing two old cabinets as the foundation for the island. They were different depths so I build out a frame to make it square and then boxed the cabinets in with a sturdy piece of plywood on the back and beadboard on the sides. The hinges to the doors from the cabinet were removed and retrofitted with a rev-a-shelf to allow for easy access to a pull out a garbage and recycling bin.

On the backside I came up with the idea of making an open bookshelf for my mom to store her cookbooks and other knick-knacks since she already had plenty of seating in her kitchen. I made the posts by taking 2x2s and wrapping them with 1x6s (for the top), 1x10s (for the bottom) and some scrap molding. For the shelf I screwed a ledge into the back of the plywood and attached it to the posts using my Kreg Jig.

To finish it off the holes were patched with wood filler and sanded down.  With a few coats of white paint and new hardware it was almost complete.  For the top my mom wanted butcher block, so she had a piece of the Ikea Numerar in oak cut to size (I got the leftover scrap for a project for my kitchen) and mounted that for the countertop. 

Along the way I wasn't sure if it would come together well and there were a number of frustrating times (including a chop saw that wasn't cutting square and a wrong molding cut that almost made me run short on molding to wrap the posts) but the end product turned out nicely. My mom and her husband are happy with it and that is what is most important to me.

Sunday
Nov272011

Michigan vs. Ohio State Tailgate Cake

Since moving to Ann Arbor I've adopted the Michigan Wolverines as the football team I root for.  Neither my undergraduate or graduate alma mater have a very strong college football program and the way everyone in town backs the team and tailgates made following the team inevitable.

As part of the tailgate that I participate in I make a themed cake each week. Yesterday was not just any game, it was the game, Michigan vs. Ohio State, so for this week's cake I made a chocolate buttermilk cake and iced it with green tinted buttercream icing to make it look like a football field.  I made the field markings, school initials and football on the cake using fondant.  To make the intials stand up I inserted skewers inside them that extended into the cake. 

Watching the game was a lot of fun, albeit quite stressful, especially during the last few minutes when the fate of the game was held in the balance.  In the end Michigan pulled out the win with a 40-34 final score and ended the 7-year winless drought against Ohio State.  Is the next stop a BCS Bowl Game?  I sure hope so!