Welcome

My name is Lisa and I'm a crafty girl with wanderlust working as an engineer by day. My blog chronicles projects in my home as well as pictures and stories from my travels.

Search


Instagram

Blog Index
The journal that this archive was targeting has been deleted. Please update your configuration.
Navigation

Entries in Building (16)

Thursday
Feb132014

Ribbon and Medal Display

Frank's (and now my!) middle niece is quite a swimmer and has amassed a ton of ribbons and medals from her swim meets. This year as I was trying to figure out what to make for her for Christmas I thought that building her a wall display so she could show off all of her awards would be fun.

After a little bit of brainstorming I came up with the idea of building a simple frame backed with some beadboard and using dowels inside the frame to hang the ribbons and medals on. I determined the dimensions based on being able to have two rows with a little extra space so it wouldn't look too crowded. If you are interested in building this yourself I have some instructions at the bottom of this post about how you can change the dimesions to fit your needs.

Supply List
- 2 - 1x2 @ 6' long
- 10' length of screen molding
- 2 - 3/8" dowels @ 2' long
- Hardboard double bead wainscot
- Package of 1/2" round wood furniture buttons
- 1/2" drill bit
- Nails
- Wood glue
- Paint

I started by cutting down some 1x2 boards to make the frame. In order to make sure the the opposite sides were the same length I clamped two boards together when making the cuts. I cut the two sides to be 36" and the top and bottom to be 20". 

Keeping the two sides clamped together I used a 1/2" drill bit to drill holes 1-1/2" and 18" from the top. I made the holes an 1/8" larger than the 3/8" dowels so it would be easy to slide them in.

I then used wood glue and my nailer to assemble the frame. I made stoppers for the dowels by plugging the left side holes in the frame by glueing in furniture buttons on the outside.

To add a little more detail I trimmed out the front of the frame using screen molding, mitering the corners for a clean look. I then used wood filler to patch my nail holes and sanded the piece smooth.

I cut down the hardboard to be 1/2" narrower and shorter than the frame and then glued and nailed it to the back.

I cut the 3/8" dowels down to 21" and the glued and nailed a furniture button on one end. This was a bit tricky and I split one of the buttons on my first try so I am glad I had a whole package.

I gave everything a coat of primer followed by two coats of paint. I added the top cleat of a Hangman French Cleat to the back for mounting.

To hang ribbons I put the dowel through the right hole and slipped on the ribbons. Once everything was on the dowel the dowel then slips into the hole on the opposite side of the frame. The furniture buttons act as stoppers and keep the dowel from going all the way through and hide the holes on the outside of the frame.

After opening her gift on Christmas Eve I hung up the display for Frank's niece in her room for her. The French Cleat that I used can hold up to 200 lbs. making it nice and secure. I attached the bottom cleat to the wall using drywall anchors. It has a cool feature where there is a level bubble in it making it very easy to line everything up.

I already had put the top cleat on the back of the display so we were ready to hang it on the wall. We then added all of her medals and ribbons and stood back to see how it all looked.

She loved it and was so proud to have the evidence of all of her hard work on display. She's a special little lady and I am so glad that she enjoyed her Christmas gift.

If you make this at home it is easy to change the dimensions for your needs. The length of your side pieces should be the desired height of your frame and the length of the top and bottom pieces should be 1-1/2" shorter than your desired width. The dowels should be about 1" longer than the top and bottom boards but it is dependant upon the wooden buttons you use so confirm that dimension before you cut. Happy building!

Friday
May312013

TV Electronics Cubby

When I last shared my living room I had put up curtains behind the TV on my old sideboard, but needed a solution to store all of Frank's electronics since stacking them on a stool wasn't doing it for me. I decided to build a cubby that would sit on top of the sideboard to house all of the electronics.

I made this project using one 1x12 and one 1x2 boards. I started by cutting a top piece and two side pieces from the 1x12. I cut 45 degree mitered ends on the top board and also on one end of each of the side boards.

Because I like to do things quick and easy I cut the side boards a bit long, clamped them together and cut the square ends at the same time so they would be the exact same height. 

I started to assemble the cubby by spreading some wood glue on all of the mitered ends.

I laid the top upside down, put the sides in place and used my speed square to make sure it was all square. I then attached the sides using my brad nailer.

In order to make sure that the cubby stayed square I attached a back brace from the 1x2. I cut it to fit and attached it with wood glue and my brad nailer. I didn't want a solid back beacuse I wanted the electronic cords to be easy tucked down behind the sideboard.

I used some wood filler to cover the holes from the brad nailer and then sanded the whole piece down smooth.

To complete the cubby I wiped it down with a tack cloth and stained it using a mixture of cherry and walnut stains that I custom mixed together to match the sideboard. After it was complete I put it in place under the TV and tucked all of the electronics inside the cubby.

Unfortunately, while the stain is a good color match to the sideboard it is a little lighter in shade. I'm debating about whether I want to darken it up a bit more or just leave it as is.

I still need something to place on the left side of the wall to balance having the TV off center, but the room is starting to come together.

Wednesday
May082013

Square Beadboard Garden Planter

With spring here I have been wanting to spruce up my front yard and I had an inkling to try building a garden planter for myself for my front porch steps. On my Yard and Garden Pinterest board I had pinned a few planters that I drew some inspiration from. I liked the beadboard sides from the planter I pinned from Plow and Hearth and the legs that raised the planter off the ground that I pinned from the Simply Planters

After doing a little sketching I came up with a design that I liked that also fit the space that I was planning on putting the planter on my front steps. I have shared my supply and cut list, but it would be very easy to resize the dimensions if you wanted to make a bigger planter.

Supply List:
1 - 2x2 @ 4 feet long
1 - 1x2 @ 8 feet long
1 - 1x3 @ 8 feet long
1-1/4" pocket hole screws
Brad nails
Wood glue

Cut List:
4 - 9" x 9" pieces of beadboard for sides
8 - 1x2 @ 9" for side supports
3 - 1x3 @ 9-3/8" for bottom slats
4 - 1x3 with 45° mitered ends @ 9" (measured from short side), 14" (measured from long side) for top 
4 - 2x2 @ 11-1/2" for legs

To start I put some wood glue on the back of the side supports and attached one to the top and bottom of each piece of beadboard.

I aligned the top support flush with the top of the beadboard and the bottom one I overhung by 3/4" which left me space to attach the bottom slats later. I then clamped the supports to the beadboard while the glue dried.

Next, I used my Kreg Jig to drill pocket holes on both sides at the top and bottom of each side beadboard piece. For two of the sides I attached the legs with pocket hole screws, aligned flush with the top.

I then attached the two remaining sides to one of the sides with legs using pocket hole screws.

I then attached the last side to complete making the box of the planter.

To make the top I put some wood glue on the mitered ends, clamped it all together into a square and then used my nailer to add a few brad nails to tack it together.

After the glue dried, I used a bit more wood glue and my nailer to attach the top to the planter box.

I then flipped the planter upside down and attached the bottom slats with some wood glue and my nailer. I left spaces between the slats for drainage.

I used wood filler to fill in the nail holes and imperfections and then sanded the whole piece smooth.

I wiped the planter down with a tack cloth and then painted it with a few coats of Valspar's Duramax Paint and Primer in Everglade Deck.

Once the planter was dry I was excited to get planting but I didn't have any potting soil so I just placed a potted calla lily in the planter for now. Before I do put potting soil in the planter I plan to line the bottom with some landscaping fabric so that water can drain out between the slats but the soil wouldn't fall through.

I'm really happy with how my planter came out and think it will add a little fun to my front porch. With this turning out successfully, I think I will have to make a second one to have a matching pair.

Note: I am posting as part of the Pinterest Challenge hosted by Young House Love, Bower Power, Sparkle Meets Pop and Red Bird Blue. If you posted anything for the challenge, please share your link with me!

Thursday
Jan032013

Doll Bed with Bedding & Patchwork Quilt

For Frank's youngest niece, who is seven years old, I decided to make a doll bed with bedding and a patchwork quilt to go with her American Girl doll for Christmas this year. 

To make the bed I used the plans from Ana White's amazing website to build the Farmhouse Doll Bed. Her instructions are super clear and it was easy to build. I finished it with spray paint primer and a few coats of white spray paint.

Next I needed to make a mattress and pillow for the bed. I bought some 1" foam and cut it to size to fit the bed frame, 14" x 19". To cover the mattress I cut a rectangle of fabric 17" x 22" to wrap around the sides and have a 1/2" seam allowance. I used a disappearing fabric marker to mark 1-1/2" from the edge of the fabric and then marked up 1/2" from the corner to know where I should stop sewing. I folded over the edges with right sides together and pinned it. 

I sewed along the line, stopping at the 1/2" mark line, clipped the excess fabric and then pressed the seam open. After doing this for all four corners I had created the top of a box for the mattress.

I then cut a piece of fabric 18" x 20" for the bottom and then pinned it to the top of my box, right sides together, lining up the edges. I sewed around the perimeter using a 1/2" seam and left an opening of a few inches. After turning it right side out I stuffed the foam mattress into the mattress cover and used a blind stitch to sew the remaining opening closed.

I made a simple rectangle pillow (two rectangles sewn together and stuffed) to complete the mattress and pillow for my bedding.

Next I made a small quilt for the bed. I chose a few fabrics I liked and cut several 3-1/2" squares from them. I laid out a 5 x 5 grid of the squares in a pattern that I liked.

I decided to add white sashing between the squares. I cut several strips white fabric 1-1/2" wide and then pinned all of the squares, except the right most row to the white strips. I then used a 1/4" seam allowance to sew the squares to the white strips. Next I ironed the seams flat toward the squares and separated the squares by cutting the white fabric between them. 

I sewed each row of the squares together with a 1/4" seam and then pressed the seam allowance flat towards the square. I then sewed a 1-1/2" strip of white to the top of each of the rows except for the top row.

I then joined the rows with a 1/4" seam and then I used white strips 2-1/2" wide to create a border around the quilt.

To prep the quilt for quilting I laid my backing fabric face down on the floor and taped it down. I layered my batting on top and then my quilt top face up. I smoothed everything out and then pinned through all of the layers. For my quilting I just sewed on the diagonal through the center of the squares.

To finish the quilt I trimmed the excess backing and batting and added teal binding around the edge of the quilt. For basics on how to add binding check out my lavender sachet post.

I think the doll quilt turned out really cute and I love how bright and colorful it is.

With the quilt complete I was excited to make the bed and see the final product all together. I think it all turned out great. 


I was so excited for Frank's niece to open the doll bed on Christmas and she really loved it. I had intended it for her American Girl doll, but she is an avid collector of stuffed ducks and within a few minutes of opening her presents she had two of her ducks tucked into the bed. It was so cute and it made me so happy to see her enjoying it.

Tuesday
Dec182012

Triptych Jewelry Stand

For Frank's oldest niece, who is 13, I decided to make a jewelry stand and small DIY earring kit (I'll share it in another post) for Christmas this year. I thought it would be fun to make a triptych with a place for earrings in the middle and necklaces on the sides, sketched out a basic design and got started building.

The first step was to make the frames. I bought some 1x2 pine boards and cut my pieces with a 45 degree mitre on the ends. I cut 6 pieces at 11.5" for the sides, 2 at 10" for the top and bottom of the middle frame and 4 at 8.5" for the top and bottom of the side frames. I did a dry fit to make sure that everything fit together nicely and then used glue and brad nails to assemble the frames.

I used wood putty to fill my holes from the nails, sanded down the frames, wiped them with a tack cloth and gave them a coat of primer.

Next, I tackled adding the necklace hooks to the side frames. I chose tiny white 1/2" cup hooks since I thought they looked cute and dainty. I marked where I wanted my cup hooks to go with a 1" spacing between hooks and 3/4" from each edge and then used a 1/8" drill bit to predrill a hole in each spot. I started each hook with my fingers and then tightened them down using a small pair of vice grips.

My next step was to add the metal mesh to the center frame for the earrings to hang from. I had some leftover perforated metal from making my bathroom vent cover which I thought would be perfect. I used my tin snips to cut a piece of the metal down to the right size and placed it on the back of the frame. I cut some pieces of screen molding to cover the rough edges and then used some wood glue and my brad nailer to attach it over the top of the perforated metal. I used wood filler to fill the nail holes and sanded it smooth.

With each of the frames complete it was time to assemble everything. I used some small 1" hinges to join the frames together. I started by measuring up 1-1/2" from the ends on each side of the middle frame, positioning the hinges, and then marking where the screw would go. I then predrilled holes on the marked spots and used a precision screw driver to attach the screw hinges. Next, I lined up the side frames with the middle frame and repeated the process of marking where the hinge screws would go, predrilling holes and finally screwing in the hinge screws.

With my jewelry stand completed all that was left was a few coats of white spray paint to finish it off. I wanted to keep the perforated metal silver so I masked it off with painter's tape before spray painting.

I think that the jewelry stand turned out cute and I hope that Frank's niece likes it. I know I would have enjoyed it when I was 13!

How are your holiday presents coming along? Are you making anything fun?

Friday
Dec142012

Small Gift Crate

With Christmas fast approaching I am busy finishing making my holiday gifts.  As a personal touch for some of the purchased items I decided to make little crates to hold the gifts. I used 1/4" poplar craft boards and made them in about half an hour. My dimensions are to fit these spices that I bought for gifts in the Caribbean when I was visiting my sister last month, but the design is so simple that you can easily modify it to fit whatever gift you are giving. 

Cut List:
1 - 1/4x4 @ 7-1/2" for bottom
2 - 1/4x4 @ 2-3/4" for ends 
4 - 1/4x1/2 @ 7-1/2" for side slats 
6 - 1/4x1/4 @ 7-1/2" for side slats  

To start use wood glue to attach a 1/4 x 1/4 slat to each edge of the bottom piece. Next, use more glue to add both ends to the crate. 

Attach a 1/4 x 1/2 slat on each side, aligning them with the top of the ends. Fill in bothe sides with the remaining slats, putting another 1/4 x 1/2 slat centered in the middle with two more 1/4 x 1/4 slats in between.

In addition to the wood glue I used my brad nailer to hold each of the slats and the ends together and make it a little sturdier. If you don't do that be sure to clamp the crate until the the glue has fully dried. 

To finish, I filled the holes with wood putty, sanded everything smooth and gave the crates a coat of navy blue spray paint.

I think the crates turned out great and can be used by the recipient for small storage later. Quick, easy and cute!

Tuesday
Nov202012

Michigan Tailgate: Block M Drink Table

Sadly, this past Saturday was the last Michigan home football game of the year. I didn't make a cake this week (I was just way too busy with work) so I thought I would share another tailgate project that I made for the tailgate a few weeks ago: a Block M drink table.

Instead of setting up drinks on the tops of coolers I thought this would be a fun addition to the tailgate. I decided to use the Michigan logo and colors (Maize and Blue) to come up with something that could easily travel to our tailgate site.

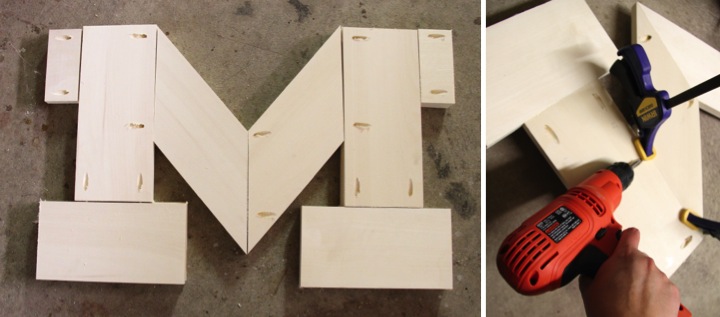
To make the table I did a little math and scaled up a version of the Michigan Block M logo so that the dimensions would work with using 1x6 lumber. Because the M is a mirror image and I was making it two boards deep I cut four of each of the following lengths from the 1x6: 13" (for the sides of the M), 10-1/2" (for the bottom serifs of the M), 2-1/2" (for the top serifs of the M) and 10" at a 50 degree angle (for the middle of the M). I did a dry fit (please excuse my dirty garage floor) to make sure everything lined up well before I continued on putting it together.

Next I drilled pocket holes in the back of the top pieces using my Kreg Jig (I will forever love Ana White's site for introducing me to the tool!), clamped the pieces together and attached them with 1-1/4" screws.

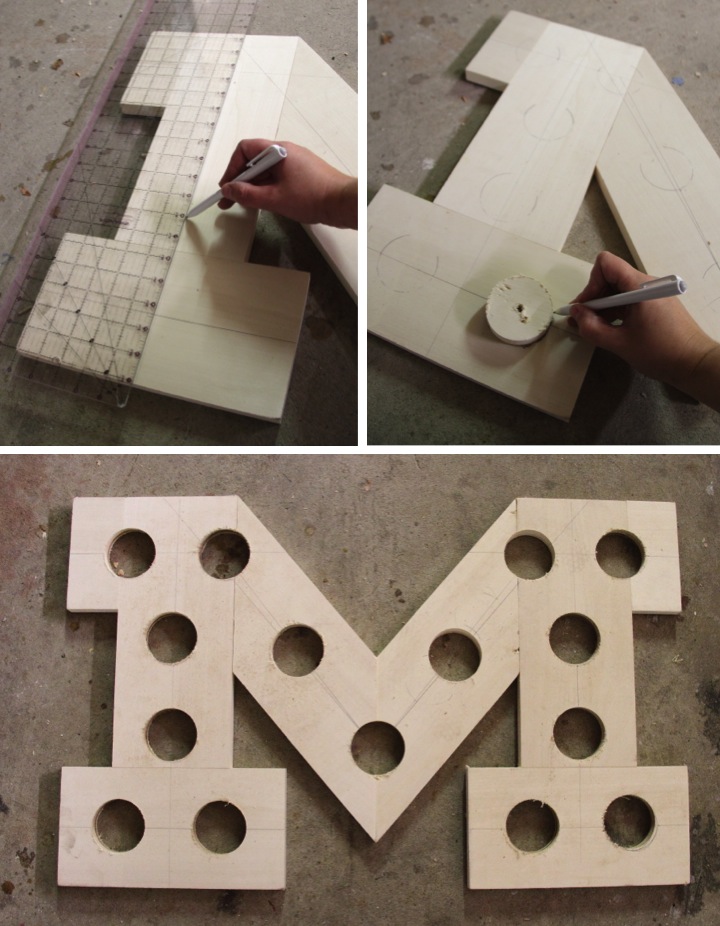
I then proceeded to make holes in the top of the M for drinks to sit in. I measured and marked the center of each board (yes, that is my quilting ruler - it is handy!) and then traced where I wanted the holes to be, making them as evenly spaced as I could. I then used a 2-1/2" hole saw to drill the holes out where I had marked.

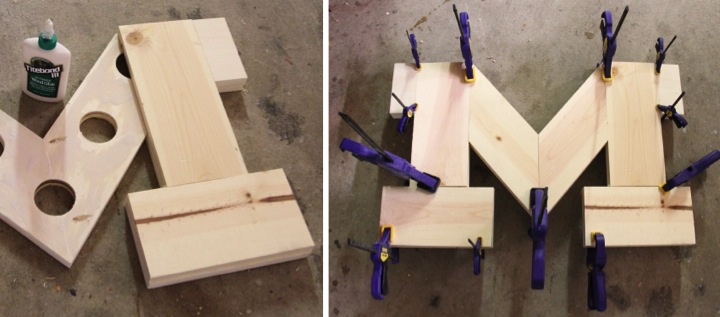
With the holes drilled I attached the back pieces to the rear of the M using glue and brad nails. I clamped everything together and let it sit until the glue was fully dried.

After that I patched the nail holes and seems, sanded it smooth, wiped it down with a tack cloth and spray painted it. I used a coat of white primer followed by two coats of yellow paint.

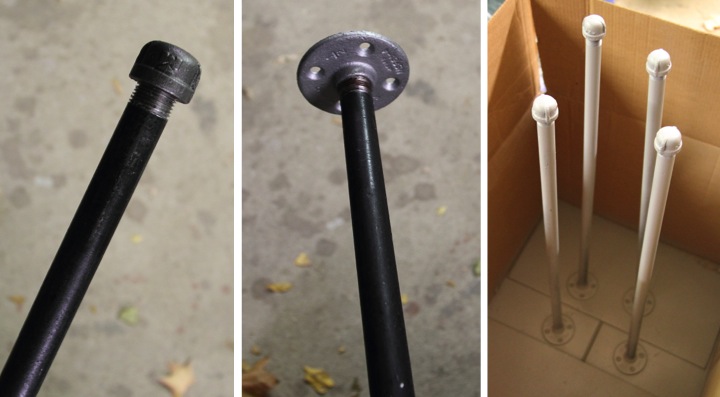
For the legs I wanted something easy to disassemble for moving around. I decided to use black pipe like I did for my console table. I used an end cap on the bottom and a flange on the top and the legs can easily unscrew from the flange. I assembled the legs before spray painting them (a coat of primer plus two coats of blue) so that I wouldn't get paint in the threads of the pipe which might have made it hard to screw together. Also, to keep spray paint from getting all over my garage I painted them in a large box.

Once everything was dry I screwed the flanges onto the back of the M and my table was complete. I have to say that it has a been pretty popular addition to the tailgate.

Cheers!

Tuesday
Oct302012

DIY Crown Molding Closet Shoe Organizer for Heels

I am short but I would just love, love, love to be tall. Because of this I have a high heel addiction and wear them everyday. In fact, I am so used to wearing heels that I can run in them as fast as I can in flats. Before you are impressed, I must disclose that I am painfully slow in whatever footwear I choose. I would tell you to think tortoise slow, but that would be slander against the tortoise.

Anyway, I digress. The point of all of this is that I have a lot of heels. I also happen to live in a house that is over hundred years old built in a time when thoughts of master suites with shoe closets were not exactly on the radar. As a result I need to make the best use of the closet space that I have to store my shoe collection. 

My old solution was terrible. It was a cheap over the door organizer that had all sorts of problems. First, it stuck pretty far out from the door making it a little unwieldy to get in and out of the closet. Second, it was just flat out ugly made from cheap plastic with metal rods. It doesn't look so bad in my pictures, but it real life it was an eyesore. Third, and most importantly it covered over the inside door handle. Normally, no one would care about an inside closet handle but when I remodeled the second floor of my house I reconfigured it to expand the closet as much as I could and to make it a pass through into the master bathroom. If I want to go from the bathroom to my room I have to wrangle the door knob through my shoe organizer. It's really annoying so I tend to just leave the door open which is not the best solution. 

Several months ago on Pinterest I pinned an image of crown molding on a wall for hanging heels from an article on Houzz.com thinking it would make a great solution for me. It has languished among my many pins, but I decided to use The Pinterest Challenge hosted by SherryKatie, Carmel and Sarah to finally get around to doing something with the idea.

Unlike the pinned image, I wanted to keep my heels inside my closet instead of displaying them on the wall. Also, I didn't want to make any holes in my old solid hardwood door (yes, I know it is bad need of refinishing). On my other closet door I had previously made a laundry sorter system from hanging baskets and had used Command Hooks so that I wouldn't damage the door. Command Hooks wouldn't be an option for this project, however, since any shoe organizer would be too heavy for them. As I was taking down my old shoe organizer, I realized that the metal part that went over the door could be slipped off the rest of the organizer and would make the perfect solution for me.

With how to hang up the shoe organizer figured out I next had to tackle the frame. I needed to make it as light as possible so it wouldn't put excessive stress on the door hinges. After sketching some ideas I decided to use 1x3s for sides with a 1x4 brace at the top. I measured a few pairs of my heels and determined that spacing the crown molding shelves 12" would allow me sufficient space for things not to be too crowded and give me six shelves. I was also careful to determine the width (22-1/2") so I wouldn't have interference with my door knob.

I didn't want to have the top have a square sharp edge so I traced a design on the top of my side supports and cut it out with my jigsaw. Next, I held up the crown molding against the side rotating it until I determined what angle I wanted it to be, which ended up being 40 degrees. I measured down 66" inches from the top (12" x 5 for the spacing between the six shelves plus an extra 6" at the top), clamped the two sides together and cut the bottom at 40 degrees. I then made a mark every 12" starting from the bottom and used the trimmed off piece as a guide to mark the angle for the molding on the sides.

With my sides cut and marked, I cut the 1x4 brace and five of the shelves at 21" and an additional shelf for the bottom at 22-1/2". I made the bottom shelf the full width because I planned it to go over the supports instead of inside like the others. I wanted the brace to be well secured to the shelf so I decided to use my Kreg Jig to make pocket holes to attach it to the sides.

To attach the crown molding shelves I put some wood glue on the ends, aligned them with the marks that I made and used some brad nails to secure them. For the bottom shelf I used glue and brad nails, but placed it on top of the angled bottom. This left a little gap which I filled in with wood putty and sanded flat.

I filled in the rest of the brad nail holes, sanded the whole piece, wiped it down with a tack cloth and I was ready for paint. I kept things simple and just gave the organizer two light coats of white spray paint.

Once the organizer was dry my last step was to attach the old metal over the shelf brackets. I drilled a pilot hole for the screw, attached the brackets with 1/2" screws and my organizer was complete.


I am thrilled with how my shoe organizer turned out. Not only is it much more functional than my old organizer (I can reach the door handle!) but it is so much prettier. 

Here is a view of the old organizer and new organizer from afar. I think it looks much cleaner to have the shoes spaced out, plus my newly built organizer sticks out less than half the amount from the door as the old one making it much easier to get in about out of the closet. Also, it is needless to say that crown molding looks prettier than cheap metal tubes any day. 

Did you make anything for the Pinterest Challenge? If so, leave a link in my comments because I would love to check it out!

Thursday
Aug302012

Building A Storage Shelf For My Back Entry

With my beadboard installed and the trim board for my hooks in place I was ready to get building. I decided to tackle the shelf first since that would be easier to install without the bench in the way.

For my shelf design I planned it together with my bench so that I could cut everything but the bench top and face framing pieces from a single piece of plywood. Also, the width of my space is a little strange and the shelf couldn't be too deep because of my window location. If you were going to make this yourself, you would need to adjust your measurements according to your space, but here was the cut list that I used.

3/4" plywood ripped to 7-7/8" wide
- 2 @ 60-1/2" (top, bottom)
- 3 @ 12" (sides, middle support)

Pine 1x2
- 1 @ 60-1/2" (bottom face frame)
- 3 @ 11-1/4" (vertical face framing)
- 2 @ 28-3/4 (shelf supports)

Pine 1x4
- 1 @ 60-1/2" (top face frame)

Pine decorative trim
- 1 @ 60-1/2" (top face frame accent) 

I started by making the box of my shelf out of the plywood. I countersunk screws into the top and bottom to attach the middle support. I offset the sides by 3/8" from the end so that the amount of face framing extending past the support would match the middle piece. I attached the sides using pocket holes on the outside since that wouldn't be seen.

On the back I attached 1x2 supports which help to keep the shelf square since there is no back. They also provide me with a way to attach my shelf to the wall studs.

With the box built it was time to hang the shelf. Before I had installed the beadboard I wrote down the measurements of my stud locations based on where the drywall screws were located. I used a countersink bit to predrill holes in the supports in the correct locations. I just lined up the shelf along the top of the 1x6 trim piece that was already level and used 2" screws to attach the shelf to the studs.

I double checked the shelf was level and then set about framing the face. I attached the bottom first then the vertical pieces and added the 1x4 along the top last. For some added interest I also attached some trim along the top that I also plan to use for my bench.

I think the shelf turned out cute and I can't wait to prime and paint it and add the coat hooks. I plan to do the finishing work at the same time as the bench so I need to build my bench first though.

Here is where I now stand with my back entry to-do list:

- Mud, tape, and sand the seams and screw holes on the unfinished drywall
- Prime and paint walls
Back the wall with beadboard and add hooks
Build a storage shelf and install
- Build shoe bench and install 
- Paint the bench, beadboard and shelves white
- Replace light fixture
- Repair ceiling and paint
- Replace the window trim
- Add baseboards
- Sew a cushion for the bench
- Sew curtains for the window 

There is lots left to do but it feels good to be crossing some items off the list. Have you been building anything for your home lately? Did it turn out like you expected?

Monday
Apr302012

Turning a Chest into a Console Table

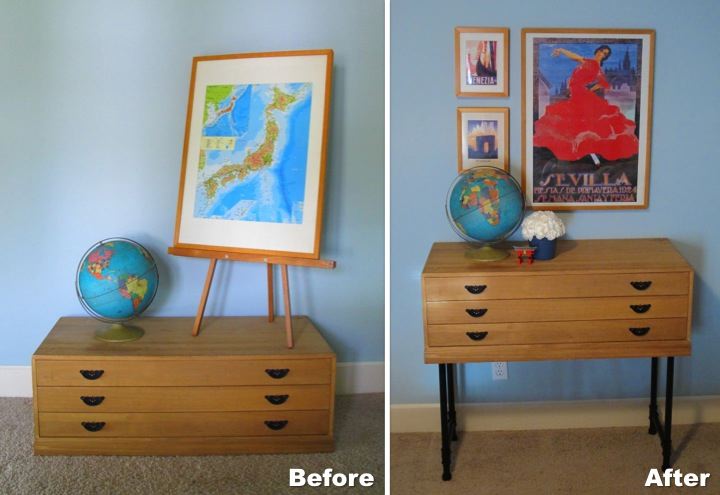
I love the little tansu chest that I bought for my apartment while I was living in Japan, but at only 14" high it has been hard to incorporate into my home in the U.S. without it looking like a piece of doll furniture.

To solve my problem I decided to try to turn it into a console table. I wasn't able to find wood with the fine grain to match the chest for legs so I decided to match the black metal pulls instead.

While I was trying to figure out what to do I remembered seeing a DIY Industrial Cart on Ana White's site that used pipes between the shelves which inspired me to use pipes for the legs. 

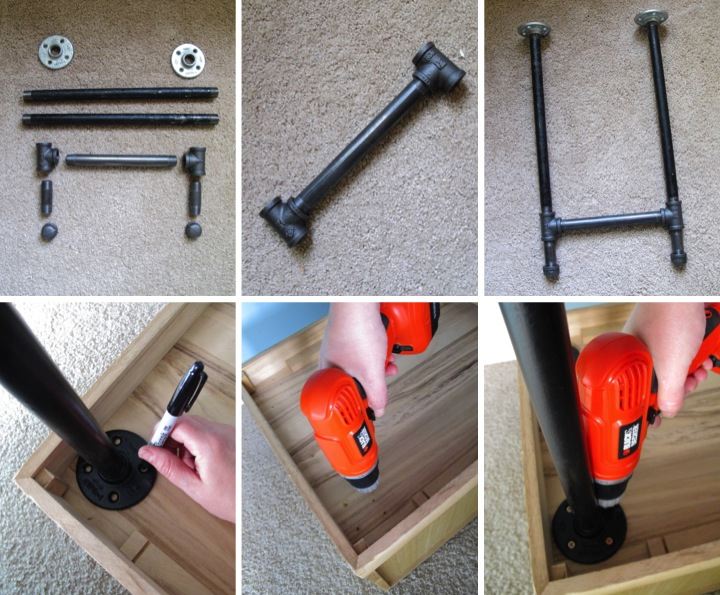
I chose to use 3/4" black pipe which I thought would be sturdy enough to support my light chest. To start I threaded two tees onto each end of a 10" nipple. On the bottom of each tee I threaded a 3" nipple followed by an end cap. On the top of each tee I threaded an 18" pipe topped by a flange. I repeated the same process for the second set of legs.

Once I had the legs assembled I gave them a coat of tinted primer followed by two coats of matte black spray paint. After they were thoroughly dried I flipped my chest upside down and lined up the legs where I wanted them to be on the bottom of the chest. I marked where the flange holes would be and then pre-drilled holes for my screws. I then put the legs back on the chest and screwed them on to complete the transformation into a console table.

Comparing how short and out of place the tansu chest looked before, to how it has now become a piece of featured furniture in my guest room makes me really happy. I think elevating the chest has made a world of difference. The legs are quite sturdy and as an added bonus with the chest raised up I now have easy access to the outlet on the wall which was previously hidden.

After the console table was done I had a bit of fun decorating. I picked up the Sevilla, Venezia and Paris prints and poster during my travels and framed them in Ikea Ribba Frames. I have had the tin globe for several years and actually used for the photo in my banner. The tiny red torii gate is a souvenir that I bought while visiting Miyajima in Japan. I finished my display off by arranging a bouquet of carnations in a little blue pot. 

With this transformation I have one little corner of my guest room feeling cozy and welcoming. Now I need to get on doing something about the ugly bi-fold doors on the closet and making a headboard.