­
Blog - homeandawaywithlisa
Welcome

My name is Lisa and I'm a crafty girl with wanderlust working as an engineer by day. My blog chronicles projects in my home as well as pictures and stories from my travels.

Search


Instagram

Blog Index
The journal that this archive was targeting has been deleted. Please update your configuration.
Navigation

Entries in Home (303)

Tuesday
Jan032012

2010 Season Michigan Wolverines Tailgate Cakes

Today is the whole reason Frank and I went on this roadtrip to New Orleans; today is the Sugar Bowl! In honor of the Wolverines I thought I would share some of last season's tailgate cakes since I already shared the OSU game cake and the rest of this season's cakes.

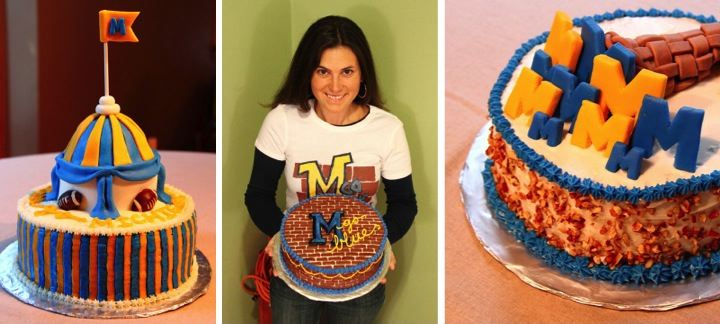
Starting from the left is the cake from the 2010 Iowa game which had a carnival theme. To make the carnival tent I used a 6" round pan and a small wondermold pan for baking the cake. I iced the cake with buttercream and used fondant to decorate the carnival tent. I molded the footballs from dark chocolate and topped the cake with a tiny flag with a block 'M' of fondant on a lollipop stick.

Grafitti was the theme for the 2010 Michigan State game so I iced my cake with white buttercream and then iced on rust colored rectangles to make the cake look like a brick wall. To make the grafitti block 'M' I painted the design with diluted food coloring gels on fondant and then cut it out after it dried. I really enjoyed this theme and even made a grafitti T-shirt to wear by painting a design on a white shirt.

The 2010 Illinois game tailgate had a Thanksgiving theme so I made a pumpkin cake and used marshmallow fondant to make a cornucopia with block 'M's pouring out. As an added touch I covered the sides of the cake with walnuts.

Go Blue! Beat the Hokies! 

Sunday
Jan012012

2012 Resolutions

Happy New Year! Like many people I am kicking off 2012 with a few resolutions for the upcoming year.

My first resolution is to purge and organize my home. I have way too much stuff due primarily to two reasons. First, as anyone who knows me can attest to, I am very sentimental so I keep everything. Do I really need a box of notes folded into footballs from Junior High? I probably do not. Second, after spending several years struggling to make ends meet while I was in school I am loathe to waste anything. If I can think of any possible reason why I may need something in the future I keep it just in case. Do I really need to keep my old, cheap can opener that slips off the rims of cans just in case my good can opener breaks? In reality, if my good one breaks I am at a point in my life where I can buy a new one instead of dealing with the hassles of my old junky one.

So, as a concrete goal I plan to get rid of one curbside trash cart (32 gallon volume) of things from my house each week. Since I plan to recycle what I can or donate anything useful to Goodwill I will count those items to my volume amount in addition to what I put in the trash. My problem in the past has been that I get too overwhelmed sorting through boxes and I think this will give me a manageable goal.

My second resolution is to finish up some of the many unfinished projects I have around the house. I bought my house in the fall of 2007 and it needed major remodeling. That phase is over but now I have a ton of finishing things that need to get done that I have been procrasinating about. My plan is to go room by room and start ticking off the items on my list. I also need to do work on my landscaping and finish up my patio furniture that I built.

I have some high hopes for being productive this year and I am going to do my best to stay on track with my resolutions. Here's to 2012! 

Thursday
Dec292011

Maize & Blue Michigan Ribbon Shoes

Frank and I are leaving today for a New Year's road trip to New Orleans. Why? To see the Michigan Wolverines play in the Sugar Bowl, of course! In honor of heading to one of the BCS bowl games I thought I'd share a shoe mod that I did for wearing to the Michigan games.

At the end of the summer I found a pair of navy flats with light blue ribbons on the discount rack at DSW and thought they would be perfect to convert into Michigan shoes. 

To modify the shoes I cut the light blue ribbon and pulled it out. It was glued down so in some sections I had to use tweezers to reach through the grommets and pull the ribbon away from the glue.

To add the yellow ribbons, I threaded ribbon onto a large tapestry needle and then wove it in and out though the shoe's grommets. I left long tails on the ribbon so that I could finish off the shoes by tying the ribbon into a bow. The shoe on the left is one after I modified it and the one on the right is before.

The shoes turned out cute and only took about 15 minutes to mod. I wore them for the beginning of football season (until it got too cold!) and I am hoping it is warm enough in New Orleans on January 3 that I can wear them again for the Sugar Bowl. Go Blue!

Wednesday
Dec282011

Canned Goods for Christmas

This year for Christmas I gave canned goods that I made at the end of the summer and early fall. I made cinnamon applesauce, pickled tomatoes with rosemary, and spearmint orange jelly. The last two are from recipes from Better Homes and Gardens Special Interest Publication Canning which I picked up at my grocery store last summer. I love canning and it seemed like a perfect gift to give this year.

To make the tags I cut 3/4" x 2-3/4" strips of cardstock. clipped the corners on one end to make a tag shape and used my 1/8" hole punch to create a hole for threading. I then wrote the contents of each jar on the tag.

For the cinnamon applesauce, I embellished the tag with some sticks of cinnamon and tied the tag to the jar with twine for a rustic look. To cut the small pieces of cinnamon I scored the stick with a serrated knife and then snapped off the piece.

To decorate the pickled tomatoes with rosemary I used red ribbon to attach the tag to the jar. I then hot glued some rosemary that I had dried from garden this summer to the back of the tag.

On the spearmint orange jelly, I used my hot glue gun to add an orange leaf to the back of the tag and a dried kumquat slice to the front. I then tied the tag to the jar with a lime green ribbon. To make the dried kumquat slices I cut some kumquats into 1/4" slices and then baked them on a cooling rack (not a cookie sheet - they will stick!) at 250 F (125 C) for about half an hour.  

Of course even though I have given away a lot of canned goods this year, I still have plenty left for myself. In fact I couldn't help but keep all of my vanilla pickled sweet cherries. Is that bad?

Monday
Dec262011

Seafoam Salad

I think it has to be a law of nature that every family in the Midwest of the US must have a time honored, treasured family Jell-O recipe. For my family that recipe is none other than the fabulously delicious seafoam salad.

Trotted out only for the special occasions of Thanksgiving and Christmas dinner, seafoam salad was the highlight of the holiday meals for my sister and I while we were growing up. For a seemingly disastrous period in the nineteen-eighties my grandmother tried an experiment where seafoam salad was served for Thanksgiving and a red and green Jell-O ribbon salad was substituted for seafoam salad at Christmas. Needless to say there was a major revolt in the ranks.

Even though my tastes have changed and grown, as an adult I still love this simple Jell-O recipe. Seeing the pale green Jell-O salad topped with whipped cream and maraschino cherries is like a time machine for me. It just tastes like the joy and magic of the holidays and makes me feel like a little kid again.

Ingredients List
- 1 can of sliced pears in heavy syrup, drained with juice reserved
- 1 package of lime Jell-O
- 1 package of cream cheese (8 oz.)
- 2 Tbsp. warm water
- 1 pint heavy whipping cream 
- Pear halves (optional)
- Maraschino cherries (optional)

Directions
- Over a medium heat burner heat pear juice to a simmer
- Remove pear juice from heat, stir in Jell-O until dissolved and set aside
- In a separate bowl, use a potato masher to mash cream cheese with warm water
- Add slightly stiff Jell-O and beat until fairly smooth
- After Jell-O mixture has cooled, use potato masher to mash pear slices into the mixture
- Whip up whipping cream and fold half into the Jell-O mixture
- Pour Jell-O mixture into a dish and place into the refrigerator
- After Jell-O has set up (about a half hour) finish by spreading the remaining whipped cream on top 

Tips and Tricks
- Although a potato masher works best with this recipe, in a pinch you could use a dinner fork to mash up the cream cheese and pears.
- For best success with whipping up whipping cream make sure that both the whipping cream and bowl are very cold. I like to pop my mixer bowl in the freezer for a few minutes prior to using it.
- I like to garnish my seafoam salad with pear halves that I have thinly sliced and maraschino cherries.
- To make sure that the maraschino cherries don't bleed red juice all over the whipped cream I rinse my cherries and blot them dry with a paper towel before adding them on top of the seafoam salad. 

Monday
Dec262011

Christmas Flowers

As a hostess gift for a Christmas Eve dinner I was attending I made this simple flower arrangement.

To begin, I bought green pom pom mums and a bag of cranberries at the grocery store. I wrapped a wide piece of coordinating green ribbon around a narrow glass vase, tucking under the end and using a glue gun to secure it. I then added a red ribbon over top which I tied into a bow in the front. 

After trimming the mums down to the desired length I arranged them in the vase. To add some extra color to the arrangement I then carefully added cranberries around the stems of the mums.

The arrangement turned out to be bright and festive and since I could make it with items from the grocery store and ribbons I had on hand it was easy and inexpensive as well.

Monday
Dec192011

Monogrammed Fleece Scarves

I wanted to make something fun and personal for Frank's nieces for Christmas and I thought that fleece scarves would be cute. I made the scarves in each girl's favorite color and then appliqued each girl's first initial on the scarf.

To make the scarves I started off with a piece of fleece and used my rotary cutter and quilting ruler to cut it 6" wide and then cut 1/2" wide fringe on the ends.

For the monogram applique I printed out each girl's initial in the font Georgia and cut it out. I placed the letters right side down on a coordinating piece of felt, traced them and then cut them out.

Frank and I are heading to New York for a pre-Christmas vacation so I had plenty of time on my hands during our drive yesterday. After I had done all the cutting at home I brought the scarves with me to do the hand stitching in the car. I pinned the felt letters to the scarves and used a small stitch to applique them, hiding the tails of my thread under the letters. 

I bought the fleece when it was on sale half off and got the felt at a ¥100 shop (Japanese version of a dollar store) when I was in Japan. With the fleece, thread and felt each scarf cost under three dollars and took less than an hour to make. I am really happy with how they turned out and hope that the girls like them on Christmas.

Sunday
Dec182011

Motown Baby Shower Invites

My girlfriend, Earnee, is expecting her first son this February and I am co-hosting a Motown themed baby shower for her in January. I was in charge of the invitations for the shower and had fun coming up with something cute to fit the Motown theme.

Because she is having a boy I decided to use a blue color scheme.  Since I was going to be making a lot of invitations I kept the design simple and thought that embellishing the front of the card with tiny records would fit the theme and be easy to make.

I started with blue cardstock that had a woven texture, cut it into 8-1/2" x 5-1/2" strips and then folded in half to make the base of the cards. I printed the shower detail information on white cardstock, trimmed it to 4" x 5-1/4", and attached it to the inside of the card.

For the front of the card I cut 1-3/4" x 5-1/2" strips of white cardstock and then attached it with two mini records on top. To make the mini records I punched out 1-1/2" circles from black metallic cardstock and 3/4" circles from different shades of blue cardstock. I layered the blue circles on top of the black ones and then used a 1/8" hole punch to make the record hole.

Everything came together well and by making the invitation assembly line style I was able to get them finished pretty quickly. With the invitations in the mail I'm ready to start working on other fun items for the shower.

Saturday
Dec172011

Kitschy Christmas Sweater 

Last Saturday, my friend hosted a house warming party for his new condo with an ugly Christmas sweater themed party. I was incredibly jet lagged from just returning from Japan and was not up for going out to hunt for a Christmas sweater at the local thrift stores. I knew that I couldn't show up without wearing something festive so I decided to quickly decorate a green sweater that I already had.

I wanted my sweater mod to be temporary so I decided to use some white craft felt that had a low-tack sticky backing that was easy to attach to the sweater but also easy to remove. I drew a reindeer onto the back of the felt, cut out the design, peeled off the backing and then applied it to the sweater.

The reindeer needed a little gussying up so I attached a googly eye and then safety pinned on a red pom-pom nose and white pom-pom tail. The final touch was tying a red ribbon and small bell around the reindeer's neck.

The whole effect was pretty kitschy and it fit right in with the other crazy Christmas sweaters at the party. It only took me 15 minutes to decorate the sweater for the party and then the next day I returned my sweater to normal by just peeling off the felt and unpinning the pom-poms. 

Friday
Dec162011

Making the Easiest Bookshelf

After sharing a few items sitting on top of the bookshelf in my livingroom I thought I would share how I made the bookshelf itself.

For the shelves of the bookcase I bought two sets old bi-fold doors from my local recycle center for $5 each. I cleaned up the doors, removed the hinge and knob hardware and patched and painted over the holes left from the hardware. Alternately you could use wood boards but I opted for the cheaper route. 

To support the shelves I made columns of bricks. Colorwise the concrete bricks I bought didn't exactly fit in with my living room so I used some cream spray paint to get the color I wanted. As a tip, once you stack the bricks only three faces will show so you can conserve spray painting by only painting those faces.

For stability when building the bookcase it is important to stack the bricks in pairs, alternating the direction as you stack. It's also necessary to use some L-brackets to anchor the shelves to the walls and I wouldn't build it taller than I did (about halfway up the wall). 

All told, the project, not including paint drying time, took about an hour of hands on time and cost me about $35. Not too bad for a custom bookcase!