Welcome

My name is Lisa and I'm a crafty girl with wanderlust working as an engineer by day. My blog chronicles projects in my home as well as pictures and stories from my travels.

Search


Instagram

Blog Index
The journal that this archive was targeting has been deleted. Please update your configuration.
Navigation

Entries in Scrapbooking (13)

Tuesday
Apr232013

Japan Birthday Trip Mini Gift Album

For my friend, EJ's birthday last month I made this mini album of a trip we took together. We were both living in Japan at the time and we went on a little trip to Iwakuni, Miyajima, Hiroshima and Dogo Onsen over her birthday weekend. That was four years ago and although I have been meaning to put some of the pictures together for her for a while this year I managed to get it done for her birthday.

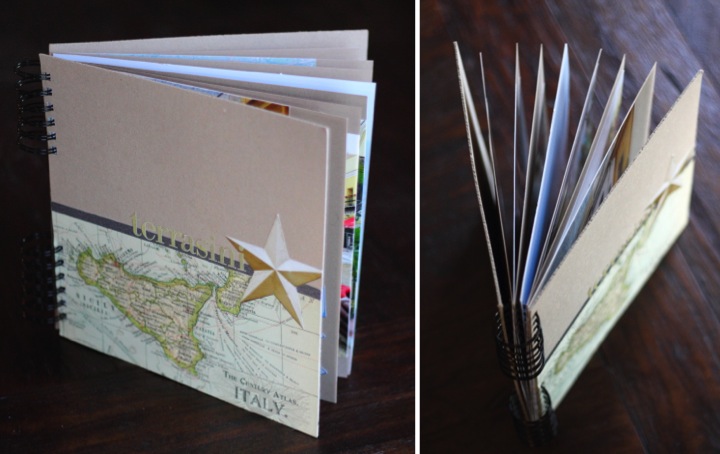
I used a small 6"x6" album with cream colored pages to make the gift. I came up with a simple teal and gold color scheme that seemed to work well with all of the photos and then pulled a few items from my stash that matched: some teal cardstock, gold textured paper, gold flower rub-ons, gold punched borders, cream letter stickers, gold gel pen and a teal colored pencil.

On the cover I kept things simple. I added a wide strip of teal cardstock, using a hole punch and a slit so that I could lay it down around the button closure. For an accent I punched a circle from an extra cream page from the album, added a flower rub-on and matted it with some of the gold textured paper.

For the opening pages I made a little map of where we went. I printed out the area from Google Maps, traced it with a gold gel pen and then colored it in with a teal colored pencil. I cut arrow tags from teal cardstock, added the location names with letter stickers and then had the tags point at the locations we visited on the map.

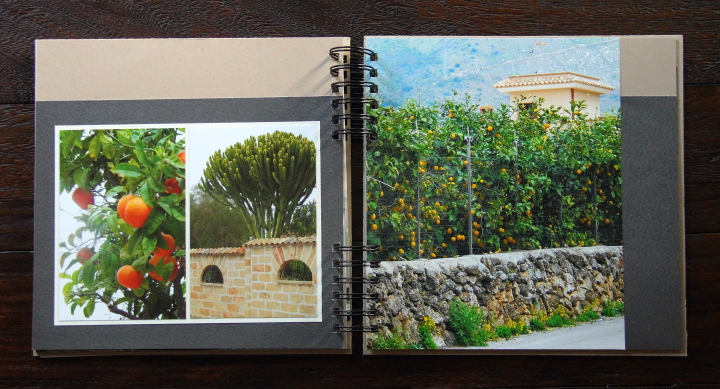
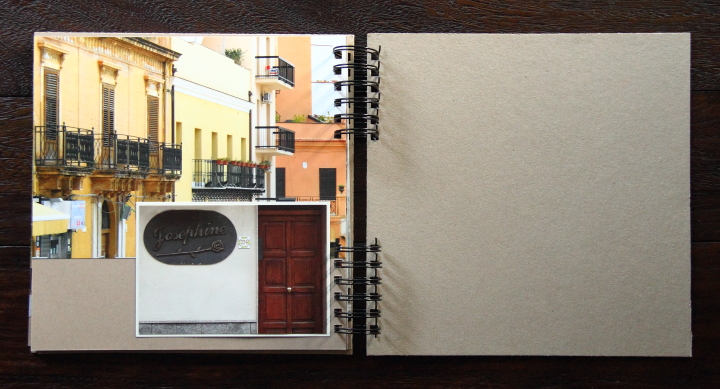
For the interior pages I continued to keep things simple by having only two different layouts for the pages. On every page I added a strip of teal cardstock to set off the photos and then on some layouts I added a strip of the textured gold paper and a gold flower rub-on and on the other layouts I added the gold punched border. For the first picture for each location I added a title with the cream letter stickers. 

On the Saturday of the weekend our first stop was to Iwakuni which is famous for Kintai-kyo (錦帯橋), a historic five arched bridge over the Nishiki River. Originally built in in the 17th century, it was washed away in a typhoon in 1950. A reproduction was built in 1953 which is what you can see today.

The steep arches and intricate wooden construction was very impressive and we walked over and underneath the bridge to see it all.

We also hired a boatman to take us out on the river for a closer view on the water.

It was such a pretty setting with the bridge elegantly spanning across the river with the historic boats lazily paddling about.

Next we headed to Miyajima (宮島) which is the popular name for Itsukushima Shrine (厳島神社). The view of the famous "floating" torii gate is considered one of the three famous views in Japan.

The torii gate only appears to be floating at high tide which we were lucky enough to see when we first arrived.

There have been shrines on the island since the 6th century, however the current buildings date to the 16th century.

Once the tide started going out, people began to walk out to the torii gate.

We also headed up Mount Misen a bit to see some of the other shrines.

I couldn't resist getting a picture with these speak no evil, see no evil, hear no evil statues.

Japan is full of warning signs so EJ had to get a picture with this cartoon sign warning that the deer on the island were dangerous.

We spent Saturday night in Hiroshima and the went to the Hiroshima Peace Memorial on Sunday morning. The memorial is built around Genbaku Dome which was the only structure that survived the atomic bomb blast in 1945.

We visited the Hiroshima Peace Memorial Museum which was a somber experience. In addition to chronicling the events leading up to the bombing as well as the devastating aftermath, there were also a lot of expressions of hope and peace for the future like these displays of origami peace cranes.

From Hiroshima we took a ferry to Mastsuyama to visit Dogo Onsen which is one of the oldest hot springs baths in Japan. We paid to have a small private room for changing which also included some tea and a sweet before we went for our lovely bath. It was a relaxing way to end our weekend trip.

To close the album I added this picture of cherry blossoms that I took on the trip for the final page.

The album was quick and easy to put together and put the emphasis on the photos. It was fun for me to relive the trip as I was organizing the pictures and I am so happy that EJ enjoyed it! 

Monday
Jan282013

Project Life: Early January

This weekend I finally had a chance to get working on my Project Life album. Instead of doing a spread for every week I am doing a spread every time I have enough pictures to fill up the pockets. This particular layout covers January 2-9. Living alone and not having kids, I am afraid that my daily life spreads (i.e. when I am not traveling) are mostly going to be about food and this layout is no exception.

I purchased the Seafoam Core Kit of Project Life insert cards and while I love the color scheme, it didn't quite go with my photos for this spread. I think what I am going to do to give my album a cohesive look is to use the black, white and grey from the Seafoam Kit and then add in one other accent color for each spread based on my photos. For this particular spread, red seemed an obvious choice to add in.

Starting from the top left corner, I took a photo from a restaurant Frank and I visited and added the name with some foam letter stickers with a band of grey cardstock.

In the top right corner I used a grid 4x6 card for the background and added a title with washi tape and rub-on letters. Since the rub-on letters are not repositionable, I tore off long pieces of the red washi tape and placed them on a piece of waxed paper. Waxed paper works great as a temporary surface because the washi tape will easily peel right off. I added the words to the washi tape with the rub-ons and then was able to adjust the title exactly how I wanted on the card before trimming the excess tape.

Working across the middle row from the left, I made a title block with some letters sticker, metal letters and some black and white washi tape. Next, I wrote some journaling about a favorite place to go on Saturday nights followed by some masala chai teat that I made and my attempts to get my craft room organized.

In the bottom left corner I divided a grid card into quadrants with lines of black cardstock and used red foam stickers to add a title. The little grey icon is from one of the 3x4 Seafoam Kit cards that I cut out to use as an accent.

The bottom right corner has a simple strip of journaling with grey cardstock and a slice of one of the grid cards. The little red dots are periods from the red foam letter stickers I used on the previous pocket card. 

On the right page of the layout, I made an enlargement of one of the photos that I took at the Michigan vs. Nebraska basketball game. We got the tickets last minute and they were pretty far away so the picture isn't the greatest but I still like it.

I downloaded pictures of the Michigan and Nebraska logos and made a design with them and the score in Power Point. I then printed it out on one of the grid cards. Along the bottom I added some grey patterned paper and a strip of black cardstock to make a journaling space under the title block.

This is only my second Project Life spread but I am having fun so far. Hopefully I can keep up for the year!

Supply List
Project Life Core Kit - Seafoam Edition
Project Life 4" x 6" Grid Cards
Project Life 3" x 4" Grid Cards
Project Life Photo Pocket Pages - Design A
Project Life 12" x 12" Page Protectors
Large red letter stickers: Unknown
Small red and grey letter stickers: lily bee design, Picket Fence Collection ABC Stickers
Red foam letter stickers: American Crafts
White foam letter stickers: American Crafts
White rub-on letters: Making Memories
Red washi tape: Target
Black and white washi tape: Love My Tapes, White Diagonal Line On Black Washi Tape
Saturday cardstock sticker: Little Yellow Bicycle
Black cardstock: Bazzill

Have you been doing any scrapbooking lately? What have you been working on? 

Tuesday
Jan082013

Project Life: Outback Bowl

This past weekend I made my first layout for my 2013 scrapbook album chronicling our New Year's Day watching Michigan play in the Outback Bowl in Tampa. I had a lot of fun making this layout and hope to keep it up over the year. 

On the left page I enlarged a photo from the game, trimmed it to 12" x 12" and used a corner rounder on the corners. I made a title block with cardstock and letter stickers and printed the box score on white patterned paper to put underneath the title.

On the right page I just used a corner rounder on my photos and tucked them into the Design A pockets. Using some letter stickers and cardstock I added "Go Blue" in the top right corner. I also added a 6"x12" protector in between the pages. On the front I added my ticket and added my journaling.

On the back I made a map of our drive home (we went straight through after the game!). To make the map I drew a rectangle that was 6"x12" in PowerPoint. I did a screen shot of the Google Maps directions and then resized it behind the rectangle to fit the space. I then added captions with times for the points along our trip. I printed everything, then deleted the map and rectangle and printed it again.

I layered the copy with just the captions over the map copy and then traced the state lines with a black marker and the route with a red marker. I then used chalk to color in the map adding extra shading around the state lines.

Journaling
Frank is a huge Michigan football fan so there was no question about where we would be on New Year's Day - of course we would be in Tampa watching the Wolverines take on South Carolina in the Outback Bowl. Honestly speaking the Gamecocks were a better team than us but we had more heart and a lot of luck on our side so we were able to pull ahead in the fourth quarter for a second time with just a few minutes left on the clock. With just seconds left Carolina scored again and we lost the game. It was an emotional game and quite a heartbreaker since it looked like we could have beat the odds and won. January 1, 2013

Supply List
Blue letter stickers: Little Yellow Bicycle, Fresh Print Traveller
Large red letter stickers: Creative Imaginations, Be Merry ABC
Small red letter stickers: lily bee design, Picket Fence Collection ABC Stickers
White patterned paper: Basic Grey, Basics White Paper Pack
Blue and yellow cardstock: Bazzill

Are you making a 2013 scrapbook? What approach are you taking?

Friday
Jan042013

Scrapbooking for 2013

It has been years since I have done any scrapbooking on a regular basis. Once every few months or so I will try to motivate myself to make a layout or I will make a mini album for a gift but that is about where it ends. I used to love scrapbooking. It was a wonderful creative outlet for me and it makes me sad that I no longer keep up with my albums.

I stopped scrapboking for a variety of reasons. Initially I starting losing my motivation when I got divorced six years ago because I was depressed and struggling to figure out my life. Not long after that I moved to Japan, which was not conducive to scrapbooking with supplies not so readily available locally and shipping from the US very expensive. When I came home I struggled with adjusting to life back in the US and my living circumstances were different. In my scrapbooking heyday I was a small apartment dweller with no maintenance, but today I own a 1800s home that I have been working on remodeling. It is a ton of work which doesn't leave me with as much time as I once had when I used to scrapbook a few times a week. 

So what to do? I want to do more scrapbooking but I need something that fits better into my life as it is today. I decided to look into trying to make a Project Life Album this year. It seems like a lot of people use the Design A Photo Pocket Pages (page protectors with 4 horizontal 4"x6" pockets and 4 vertical 3"x4" pockets) and make a spread for every week but this approach didn't seem ideal for me for two reasons.

First, my life is not scrapworthy on a weekly basis in an even way. Some weeks when I am on vacation I would probably want to have more than one spread. When I am not traveling, my life is pretty boring and routine since I work a lot and live alone. Somehow, repeat weekly spreads consisting of me working 60 hours and eating spaghetti for dinner don't seem so interesting.

Secondly, while I like the idea of just slipping my 4"x6" photos into the pockets I have always loved using photo enlargements for my scrapbooking so using only the Design A Photo Pocket Pages seems like it wouldn't be ideal for my personal scrapbooking style.

I thought about it for awhile and decided to order a pack of the Design A Photo Pocket Pages and a pack of 12 x 12 Page Protectors. My plan is to have each spread consist of a pocket page on one side and a plain protector on the other side. I think this will give me the best of both worlds allowing me the simplicity of just slipping my photos in on one side and while also having the ability to use an enlargement with some traditional scrapbooking techniques on the other side. I'm also going to make spreads over the year as things come, not limiting myself when fun things are going on and not forcing myself to scrap every week. I'm looking forward to trying to some scrapbooking this year and am hopefully that this approach will help me do it.

Do you have any scrapbooking goals this upcoming year? Have you ever used Project Life for scrapbooking? If so, how do you use it?

Saturday
Dec152012

Terrasini Gift Scrapbook Album 

Earlier this year Frank and I went on vacation to Italy and stopped in the small Sicilian town of Terrasini, which is where Frank's paternal grandfather was born. Frank's great-grandfather and grandfather would head over to Detroit to work long hours in the auto industry and then head back to Sicily bringing money home. Frank's grandfather eventually decided to settle down in America and raise his family in Michigan.

We decided when we were planning our Italian trip that we wanted to see Terrasini. We took a boat from Naples to Palermo and then planned to take a day trip to Terrasini from there. We ran into a snag when we went to went to Palermo Centrale station and discovered that the TrenItalia website's timetable was not correct and the next train wasn't for a few hours. We had not come so far to be deterred and negotiated a good price with a taxi driver to take us to Terrasini. We had a wonderful day exploring the town and it was quite an experience to walk along the streets of his ancestors.

For Christmas this year I decided to make Frank's dad (who has never seen the town where his father was born) an album of the photos I took of Terrasini while we were there. I have a stash of albums and chose a 10" x 10" 7gypsies album with kraft cardstock pages and a kraft chipboard cover with wire binding.

To start I carefully removed the covers and pages from the wire binding so that I could have my pictures extend to the edge of the inside of the pages. I wanted to keep things simple and just used some brown patterned paper and cream cardstock for matting pictures inside the album. After finishing each page I flipped it face down and used an X-acto knife to cut out where my design had covered the square holes for the wire binding. When I finished the everything I reassembled the album.

To decorate the cover I cut up a piece of wrapping paper with a vintage map of Italy on it. Since Terrasini is on Sicily I put that section on the front and used another section of the map for the back. I added a small strip of brown patterned paper that I used throughout the book to set off the map from the chipboard cover. As an accent I cut out a star from a photograph of a statue in Terrasini (more about the statue later) and finished by adding a title with letter stickers.

On the front page of the book I enlarged a photo of one of the streets in Terrasini with the mountains in the background. I also cut out the some sign markers from a picture I took on the outskirts of town and placed them in the right corner.

The first place that Frank and I stopped in Terrasini was Piazza Duomo, the central square in town flanked by shops and cafes with Cathedral of Santa Maria delle Grazie sitting at the end. The stonework of the piazza was being replaced while we were visiting and I am sure it will look quite lovely when completed.

The streets and buildings in town were charming and I loved the small second floor balconies.

We walked out to the coast which was beautifully rocky and impressive, despite the cloudy day. For this section I enlarged a photo to 16" x 20" and trimmed it to span both pages of the spread.

The coolest part of the visit was stumbling upon this statue which has Frank's great-grandfather's name on it. From what we can tell it was erected by citizens of Terrasini who had worked in Detroit (one of those people being Frank's great-grandfather) in honor of a fallen World War I soldier. It was pretty amazing to come halfway around the world and see this.

We next walked a little out of town to try and find a second cousin of Frank's knowing only a street name that he had lived on a few years back. We walked up and down the street looking at the names on the gates but didn't find the name, unfortunately. It was a lovely area though with an abundance of orange trees and beautiful gardens.

We walked back through town with me taking more pictures along the way, of course.

On the final page I put an enlarged photo of some of the shops along Piazza Duomo along with a sign that we saw with Frank's grandmother's first name.

I am happy with the way the album turned out and I hope that Frank's dad enjoys it.

Have you made any scrapbook albums for gifts this holiday season?

1/3/2013 Update: Courtney requested in the comments that I provide an update on Frank's dad's reaction after I gave it to him. He really liked it and I saw him quietly looking through the album several times over the course of the evening as well as pointing out the family name on the statue to each of Frank's nieces.  It made all the effort worthwhile to see him enjoy the album so much. 

Tuesday
Oct232012

Craft Room Cleanup Giveaway: Fall Supplies

This is what my craft room looks like right now.

Yes, I am embarrassed. Yes, I know it's a hot mess. Yes, I am aware that there is a distinct possibility that house elves have moved into that warren of chaos without my knowledge. It's time for me to get my tush in gear.

I have some small pockets of organization in the room like my shutter organizer and my fabric storage but they are buried behind a wall of clutter right now. I need to clean up, purge and make this a useable work space again.

My hoardng problem is your gain because as I sort out my craft supplies and figure out what I don't really need I am going to give them away. My plan is to fill up USPS Priority Flat Rate boxes and host giveaways here on my blog with the first one happening today.

Since it is Autumn right now I thought I would load this first box up with Fall inspired goodies. I've got lots of papers (over 100 sheets) for scrapbooking or card making in earth tone and jewel tone hues as well as a bunch of embellishments like ribbons, stickers, decorative tape, chipboard shapes, etc. Most of the items are just autumnal by color palette but there are a few specific Thanksgiving and Halloween things thrown in for good measure. Below is a sampling of what is included.

All you have to do to enter is comment on this post telling me a favorite fall memory or what you love about fall.

You can submit additional entries with separate posts doing one of the following:
Like my page on Facebook (Post what name you liked me under)
Follow me on Pinterest (Post what name you followed me under)
- Pin one of my posts to Pinterest (Post a link to your pin)

Only posts on my blog (not on facebook) will count as entries and you can have a maximum of five total entries.

Some Rules:
- To be eligible you must be 18 years of age or older and have a shipping address in the US  (sorry, international shipping for such a heavy box is really pricey)
- Entries will close on Thursday October 25, 2012 at 12:00 Noon EST
- The winner will be chosen by a random number generator based on the posts
- I will notify the winner by email and they will have 72 hours to confirm with a valid US address  
- This prize is being provided by Home and Away With Lisa from my craft room stash and I am not being compensated in any way for this giveaway

Monday
Jul232012

Baby Mini Scrapbook Album

Some of my friends who live in Japan recently had a beautiful, healthy baby boy. I was really excited to have a chance to see them and meet their new little man while I am in Japan for work. As a gift for the new parents I made a mini scrapbook album for them that they could put pictures of their baby inside.

To make the baby album I took a basic chipboard mini album and gave all of the pages and the cover a very light coat of teal spray paint. I didn't want to soak the pages and it ended up having a neat very subtle mottled look. With the crazy humidity it took almost two days until the pages weren't tacky anymore and I had to be careful to fan everything out while it was drying so the pages wouldn't stick together later.

Once the album and pages were completely dried I set about decorating the cover. I used some white linen tape that I use for mounting photos and wrapped it around the front and back of the covers. I then took some black ribbon and added it just below the linen tape with some glue. As a final touch I used some black letter stickers to add the baby's name to the bottom right on the front cover. 

For the inside pages I came up with three basic layout variations that I repeated with each page having a blank white photo mat. For the top one I attached three pieces of black and white striped washi tape down the right side with a piece of black ribbon in the upper left corner. For the middle variation I adhered a piece of teal and white chevron paper on the right side with black ribbon and then made a little accent of black and white chipboard periods in the upper left corner. On the final variation I attached more of the black and white striped washi tape across the bottom and layered a few black and white chipboard carats on the right side.

I think the album came out cute and I hope the new parents enjoy putting photos in it as much as I had fun making it. 

Thursday
May102012

Scrapbook Layout: Iya Kazurabashi

This is another layout that I completed this past weekend while scrapbooking some of my Japan photos on National Scrapbooking Day.

Iya (祖谷) Valley is a remote, magical place in Shikoku, one of the four major islands of Japan. I particularly love the old vine bridges there and made this layout about them.

I really liked these two photos so I enlarged them to 8"x10" and placed one on each side of the layout matted with a thin white mat. I kept a green and brown color scheme to match my photos using a tan patterned paper for the background. For my journaling block I layered vellum over my photos and then added small scraps of brown and green paper for accents and to back my title. I hid the adhesive for the vellum underneath the other papers so it wouldn't show through.

The journaling reads, "My favorite part about visiting Iya Valley was seeing all of the beautiful vine bridges known as kazurabashi. Iya Valley, with its steep mountainsides, was notoriously difficult to traverse. Dating to about a thousand years ago locals developed a method for building bridges across the valley. Wisteria vines were grown on either side of the river until they could span the valley. The vines were then woven with planking to form bridges. Nowadays three bridges remain in Iya Valley and are reinforced with metal cables. Walking across the bridges is not only lovely but has a wonderful sense of history as well. What an amazing experience! 8/10"

If you are interested, check out some of my other layouts: Scrapbooking 

Monday
May072012

Scrapbook Layout: Itsukushima

This past weekend I went to a crop for National Scrapbook Day and got a few layouts completed. I brought a bunch of Japan photos with me and this layout about Itsukushima (厳島神社) was the first one I finished.

I love the red, white and blue colors in the photos that I took at the shrine so I decided to play that up with my layout's color scheme. I matted the enlarged photo with red barnwood patterned paper that reminded me of the shrine beams. On the right side I thought that the teal chevron paper looked striking as a background. I then added a strip of teal cardstock to back my white sticker title and some teal lined notebook patterned paper for journaling. As a small finishing detail I added a number strip, circled the "3" and wrote "views" in script underneath it.

The journaling reads, "Itsukushima, located off of the coast near Hiroshima, is seen as one of the three great views of Japan. Founded in 593 at the base of Mount Misen the shrine is famous for the enormous torii gate built out in the bay. At low tide it is even possible to walk out to it and walk around the base. All of the buildings at the shrine are white with vibrant vermilion beams that make a lovely contrast with the blue skies and water that surrounds the island. I love the majesty of the shrine so much that I have visited it twice while in Japan. It is a truly amazing and spectacular place. 8/2010"

If you are interested, check out some of my other layouts: Scrapbooking

Saturday
May052012

National Scrapbook Day Cupcakes


Happy National Scrapbook Day! Today I am excited to be heading off to scrapbook with some friends at a little overnight getaway. I haven't been to a crop in several years so I am really looking forward to this.

I thought for fun I would bring some cupcakes to share at the crop. I made some yellow cupcakes and then while they were baking and cooling I made Happy NSD cupcake picks to decorate them.

Using powerpoint I made little pink circles that said "Happy NSD" on them. For fun I also added a pair of grey scissors (from the webdings font). After printing out the circles I used my large circle punch to punch them out. I glued them to some cranberry cardstock with a glue stick and  then cut them out leaving a thin border. 

To make them into picks I attached small skewers to the back of them with double sided tape and then layered another pink circle on top of the back to finish them off. 

By this time the cupcakes had cooled so I iced them with some pink icing. To get the right color to match the picks I used some burgundy color paste and a tiny, tiny amount of blue. After inserting the Happy NSD picks into the cupcakes they were all finished and ready to take to the crop.

What are you doing to celebrate National Scrapbooking Day? Are you going to a crop with some friends or scrapbooking at home?