­
Blog - homeandawaywithlisa
Welcome

My name is Lisa and I'm a crafty girl with wanderlust working as an engineer by day. My blog chronicles projects in my home as well as pictures and stories from my travels.

Search


Instagram

Blog Index
The journal that this archive was targeting has been deleted. Please update your configuration.
Navigation

Entries in Home (303)

Wednesday
Mar052014

Baby Quilt for Kristen's Little Lady

My friend Kristen just had her first little one last month. She and her husband kept the gender of the baby a surprise so she decorated her nursery to be gender neutral and I drew upon the colors she was using for the baby quilt I made for her. Frank and I got to meet the baby (they had a girl!) a week and a half ago and she was so sweet and beautiful.

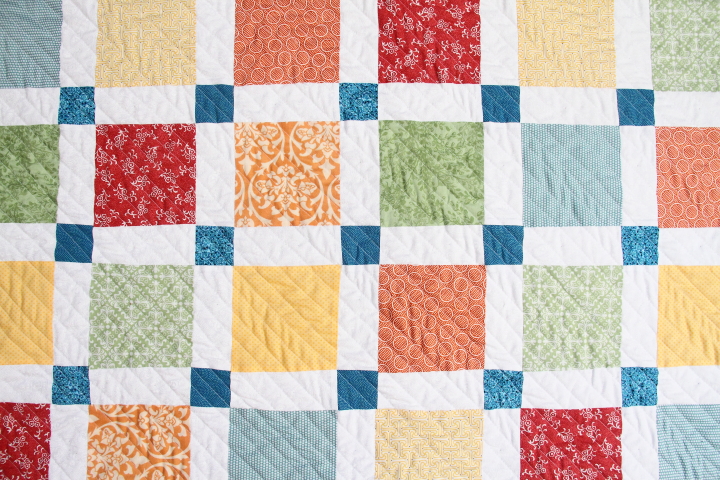
I made the quilt using a modified version of a disappearing nine patch. A disappearing nine patch involves making a nine patch block and then cutting it into four smaller blocks. I like to oversize things and then cut it down for a little more accuracy so I adjusted my piecing accordingly.

To make the quilt I used eight different colored fabrics, a patterned white fabric and two different dark turquoise patterns.

Using 44" wide cotton I cut one 5-1/2" wide strip from each of the eight colors, one 5" wide strip from each of the two turquoise fabrics and four 5-1/2" wide and four 5" wide strips from the white fabric.

Next, I started assembling the strips, making four pieced strips by sewing one of the color strips on either side of a 5" wide white strip. I then cut eighteen 5-1/2" tall strips from the pieced color strips.

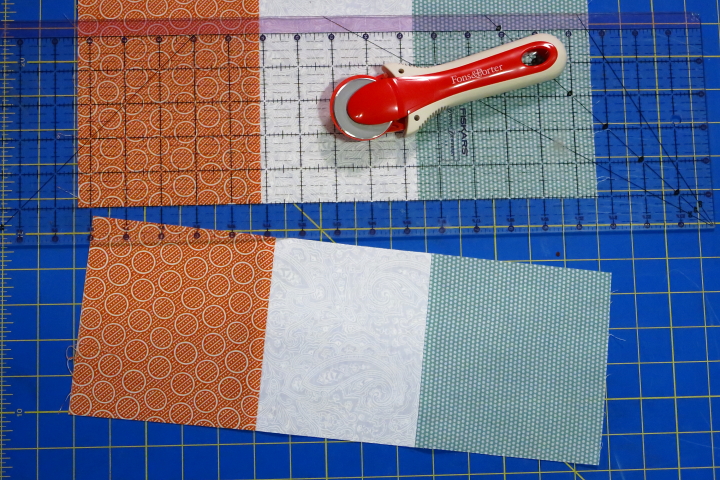
I then made two turquoise center pieced strips by sewing 5-1/2" wide strips of white on either side of the 5" wide strips of turquoise. I then cut nine 5" tall strips from the pieced turquoise center strips.

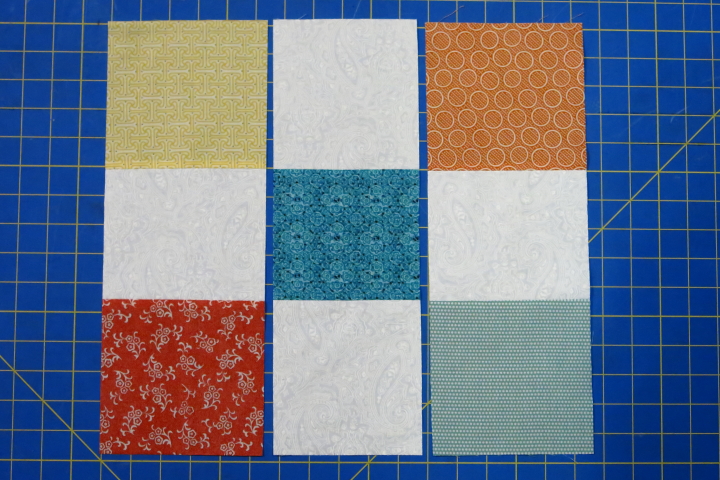
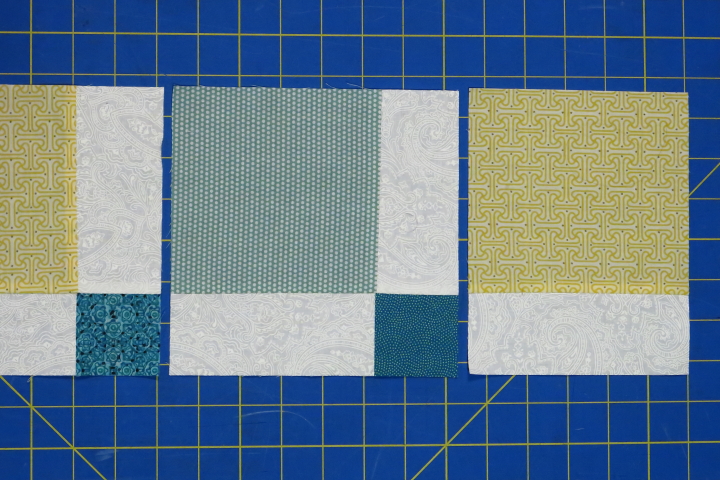
To make the nine patches I joined a color strip on either side of a turquoise center strip.

After making nine of the nine patches for the quilt I then cut them apart to make the blocks. I lined up my quilting ruler 2" from each of the seams and cut both vertically and horizontally.

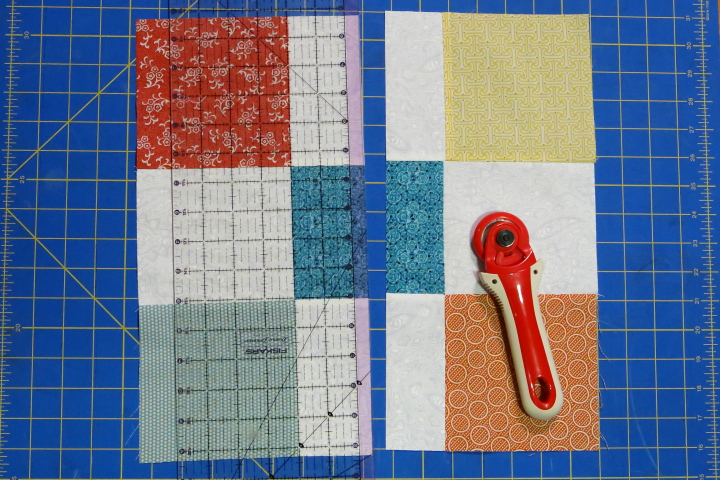
When I was done cutting the nine patch apart the white was 2" wide and the turquoise was a 2" x 2" square.

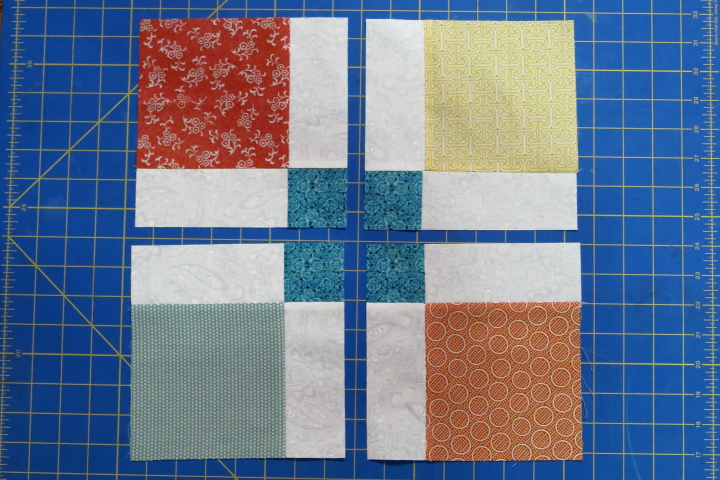
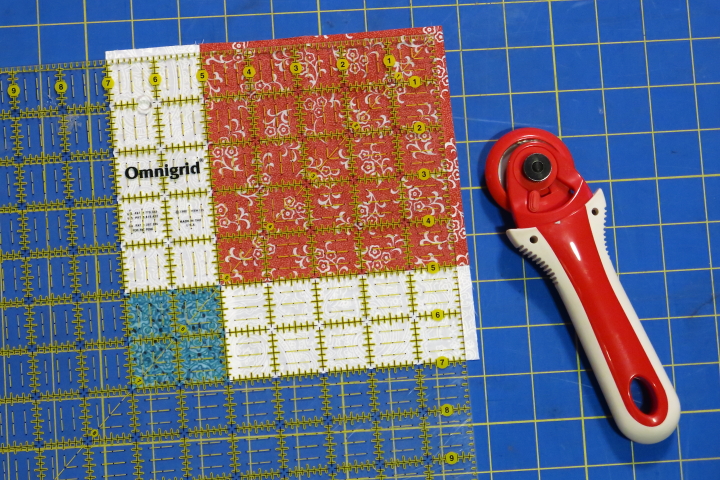
I then trimmed down the outside edges down to make the disappearing nine patch blocks 7" x 7".

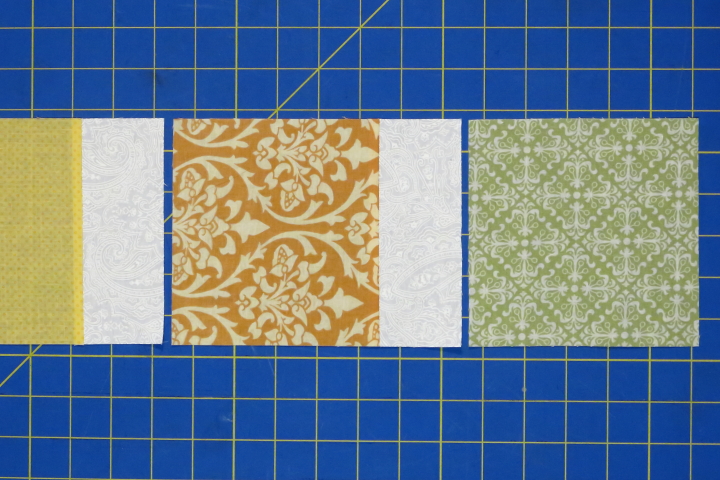
Next I made twelve edge blocks by cutting down the leftover pieced color strips. I cut the blocks 7" tall (5" of color fabric and 2" of white) and 5-1/4" wide.

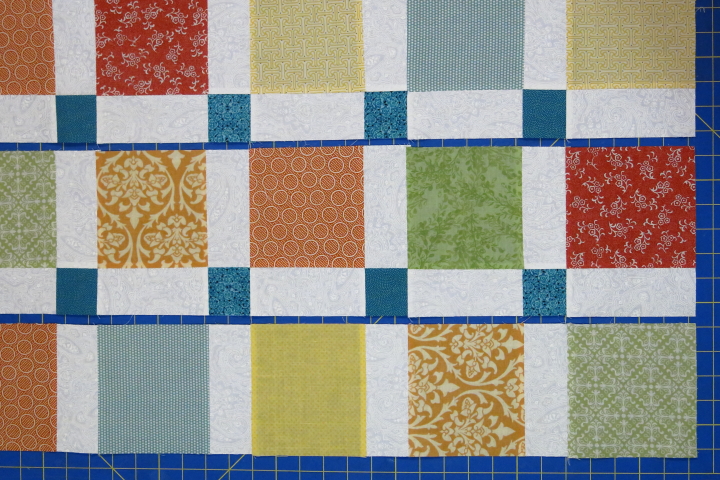
I started assembling the rows by sewing together five disappearing nine patch blocks (turquoise square to the bottom right) with an edge block on the end (white strip down).

After making seven rows I made the bottom row by sewing together five edge blocks (white strip to the right) with a 5-1/4" x 5-1/4" square from one of the color fabrics on the end.

To finish the quilt top I sewed all of the rows together.

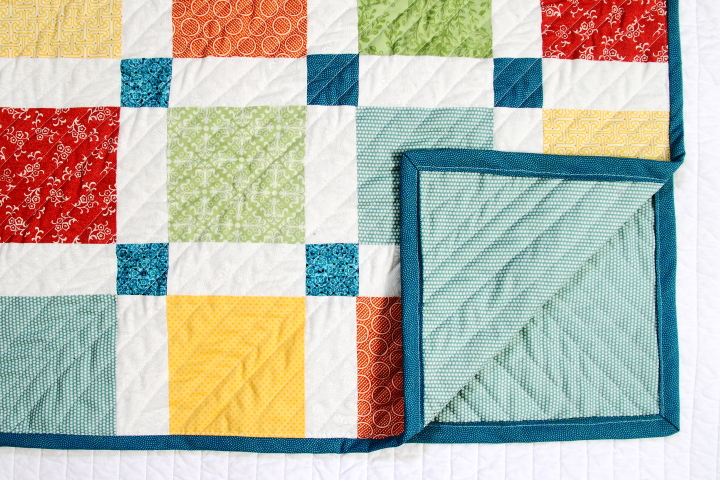
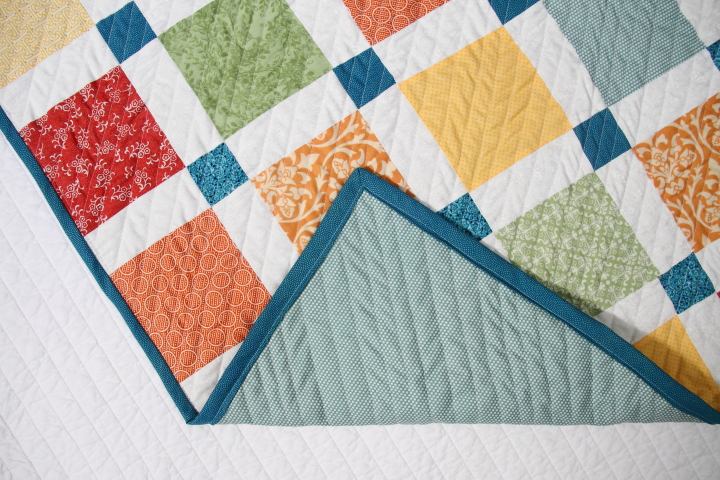
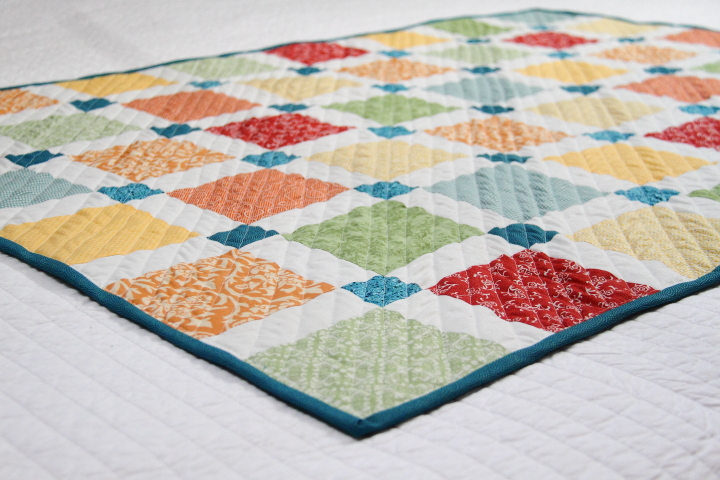
I finished the quilt with a light blue fabric for the backing and bound it with one of the turquoise fabrics that I used. For the quilting I sewed diagonal lines at a random spacing across the quilt.

I am really happy with how the quilt came out. I think it is bright and fun and I hope that Kristen's little girl will enjoy snuggling with it.


Friday
Feb142014

Candy Dipped Oreos for Valentine's Day

Happy Valentine's Day! This year I wanted to make a little treat for the people in my department at work for Valentine's Day so I made these candy dipped Oreos to bring in to work today.

To start you will need Oreos, candy melts, sprinkles and wax paper. Lay out some sheets of wax paper and place candy melts into a small microwave proof bowls.

Microwave them for 60 seconds and then stir. If some lumps still remain microwave another 30 seconds and then stir until smooth. Dip Oreos halfway into the melted candy and then place on to wax paper. 

While the candy coating is still wet add sprinkles for a festive touch. Once the candy coating has cooled and hardened you can stack the Oreos on a serving plate or package them in treat bags.

If your melted candy starts to cool making dipping difficult, just put the bowl back in the microwave for a few seconds until it is smooth again.

These have been a favorite festive little treat to make for me since I was back in undergrad fifteen years ago. You can customize them for any holiday or occasion by the colors of sprinkles and candy melts that you use plus they are super quick and easy to make.

If you are interested check out some of my other Valentine's Day related posts: Valentine's Day Mini Heart Cupcakes and Celebrating Valentine's Day (and White Day) in Japan

Thursday
Feb132014

Ribbon and Medal Display

Frank's (and now my!) middle niece is quite a swimmer and has amassed a ton of ribbons and medals from her swim meets. This year as I was trying to figure out what to make for her for Christmas I thought that building her a wall display so she could show off all of her awards would be fun.

After a little bit of brainstorming I came up with the idea of building a simple frame backed with some beadboard and using dowels inside the frame to hang the ribbons and medals on. I determined the dimensions based on being able to have two rows with a little extra space so it wouldn't look too crowded. If you are interested in building this yourself I have some instructions at the bottom of this post about how you can change the dimesions to fit your needs.

Supply List
- 2 - 1x2 @ 6' long
- 10' length of screen molding
- 2 - 3/8" dowels @ 2' long
- Hardboard double bead wainscot
- Package of 1/2" round wood furniture buttons
- 1/2" drill bit
- Nails
- Wood glue
- Paint

I started by cutting down some 1x2 boards to make the frame. In order to make sure the the opposite sides were the same length I clamped two boards together when making the cuts. I cut the two sides to be 36" and the top and bottom to be 20". 

Keeping the two sides clamped together I used a 1/2" drill bit to drill holes 1-1/2" and 18" from the top. I made the holes an 1/8" larger than the 3/8" dowels so it would be easy to slide them in.

I then used wood glue and my nailer to assemble the frame. I made stoppers for the dowels by plugging the left side holes in the frame by glueing in furniture buttons on the outside.

To add a little more detail I trimmed out the front of the frame using screen molding, mitering the corners for a clean look. I then used wood filler to patch my nail holes and sanded the piece smooth.

I cut down the hardboard to be 1/2" narrower and shorter than the frame and then glued and nailed it to the back.

I cut the 3/8" dowels down to 21" and the glued and nailed a furniture button on one end. This was a bit tricky and I split one of the buttons on my first try so I am glad I had a whole package.

I gave everything a coat of primer followed by two coats of paint. I added the top cleat of a Hangman French Cleat to the back for mounting.

To hang ribbons I put the dowel through the right hole and slipped on the ribbons. Once everything was on the dowel the dowel then slips into the hole on the opposite side of the frame. The furniture buttons act as stoppers and keep the dowel from going all the way through and hide the holes on the outside of the frame.

After opening her gift on Christmas Eve I hung up the display for Frank's niece in her room for her. The French Cleat that I used can hold up to 200 lbs. making it nice and secure. I attached the bottom cleat to the wall using drywall anchors. It has a cool feature where there is a level bubble in it making it very easy to line everything up.

I already had put the top cleat on the back of the display so we were ready to hang it on the wall. We then added all of her medals and ribbons and stood back to see how it all looked.

She loved it and was so proud to have the evidence of all of her hard work on display. She's a special little lady and I am so glad that she enjoyed her Christmas gift.

If you make this at home it is easy to change the dimensions for your needs. The length of your side pieces should be the desired height of your frame and the length of the top and bottom pieces should be 1-1/2" shorter than your desired width. The dowels should be about 1" longer than the top and bottom boards but it is dependant upon the wooden buttons you use so confirm that dimension before you cut. Happy building!

Thursday
Jan022014

Homemade Spiced Rum Vanilla Extract

Now that Christmas has passed I can start sharing on my blog all of the Christmas gifts that I have been busy making the past several weeks. As a simple gift for friends and family I decided to make a bunch of bottles of homemade vanilla extract. The basic way to make it is to infuse a white alcohol, like vodka, with vanilla beans but I thought it would be fun to use spiced rum instead for a different flavor.

To make the vanilla I sliced Madagascar vanilla beans down the middle not quite to the end and trimmed the bottoms so they would fit in the bottles. I then placed two beans in each of the 8.5oz swing top square glass bottles that I had thoroughly scrubbed and then filled them up with spiced rum. I did this all back in November so that the vanilla beans would have enough time to infuse the spiced rum before I gave the bottles as gifts for Christmas.

To label the jars I made a simple design and used my Silhouette Cameo to cut it out from white vinyl. I then used transfer paper to apply the labels to the bottles and the vanilla extract was ready to give.

I made little cards with the following information to hand out along with the bottles:

Homemade Spiced Rum Vanilla Extract
Use in baking recipes just as you would with plain vanilla extract. Discard the vanilla beans when they are no longer covered in liquid or after two months when the beans are fully infused, whichever comes first. Shelf life for the homemade spiced rum vanilla extract is one year.

If you are making vanilla extract at home for yourself you can keep topping up your bottle with alcohol and replace the beans after they have finished infusing.

The homemade vanilla extract was a big hit with my friends and family this Christmas and I have to say that I loved the project so much that I saved a bottle for myself which I am excitedly using.

Friday
Dec272013

Merry Belated Christmas!

Merry belated Christmas! Frank and I had a great Christmas spending Christmas Eve at his sister's home and heading to his parents' on Christmas Day. We ate too much delicious food and had fun hanging out.

I've been busy the last week working on finishing making my Christmas gifts so I thought I would belatedly share our home's Christmas decorations. Frank and I didn't host anything but I still love to dress up the house a bit for the holidays.

Except for some new ornaments for the tree all of the decorations were things that I already had on hand or made previous years for Christmas. We got a noble fir from a local tree farm and set it up in the corner of our living room. We decorated it with silver and teal glass balls that I already had with a new collection of glass ornaments that we started this year representing places we've visited along with our hobbies and interests.

A few years ago I made some teal and white throw pillow covers for Christmas that I put out again this year. My favorite one is the corduroy one with the felt snowflakes on it.

I couldn't resist adding a little bit of holiday fun on our TV stand with some extra glass balls and a star.

I added some more glass balls in a wooden dish that I got in Honduras on our coffee table. I made the teal and white runner a few years ago and have matching ones on the dining table and buffet as well.

On the dining table I cut out teal felt circles to top candlesticks I had from IKEA for perches for silver spray painted pinecones. In between the candlesticks I placed goblets I found thrifting which I filled with more glass ball ornaments.

On the buffet I filled two glass jars, one with mini pine cones and the other with glass balls, and put some white bottle brush trees under a cloche behind them.

Because I already had everything on hand it didn't take me long to decorate and it was worth it to having everything look festive for Frank and I to enjoy for our first Christmas married.

How was your Christmas? Did you have a nice day with family or friends?

Thursday
Dec192013

2013 Holiday Cards

I am finally starting to get some of my holiday cards in the mail today. This is the first holiday for Frank and me to send a card together since it is our first Christmas married and I had a lot of fun making these cards for our friends and family.

To make the card I started with some blank cards that I had found a while back that had two folds with a cut out at the top. Since I have friends from a variety of religions I decided to make the card saying "Wishing you joy this season."

I thought it would be cute to have the "joy" pop out from the back of the card through the opening so I used my Silhouette Cameo to cut out circles with the word "joy" from red textured cardstock . I attached the circles to the center of the opening with some foam tape so they stood off from the card 1/8".

I added the rest of the words using my Silhouette Cameo to cut "wishing you" and "this season" from black vinyl and used transfer paper to add them just above and below the circle on the innermost part of the card. To make it all stand out I used some white polka dotted black washi tape to frame around the opening on second page of the card. 

I like how the card turned out. It was simple enough that I could make a bunch of them in a day (thank goodness I am on vacation this week!) but they are unique for Frank and I to send to the special people in our life.

Happy Holidays!

Tuesday
Dec172013

My Japanese Christmas Tree Decorated with Orizuru (Paper Cranes)

When I was living in Japan I was set on having a small Christmas tree for my apartment. Most Japanese people are not Christians but due to Western influences some Christmas customs like exchanging presents, particularly between couples on Christmas Eve, have become popular. As a result I was able to find myself a little table top tree with all the trimmings after hunting around for a bit. I found my little set-up at Nittori, which is home goods store kind of like a Japanese version of Ikea. My options were quite limited since the trees were sold as a package set including the lights and decorations, but at least I had a small Christmas tree plus it was a great deal at only ¥999 (about $10 US) for everything.

After taking the tree home and setting it up in the corner of my living room I thought it looked a little plain with just the silver balls and lights since I wasn't so keen on the red bows and garland that also came with my set. After thinking for a bit I decided to make some paper cranes to add to the tree's decorations. Orizuru (折鶴, folded crane) is a classic origami design and the paper cranes are symbols of peace, good fortune and good health among other things. It seemed like the perfect fit for my Christmas tree.

I pulled out a few sheets of red origami paper as well as some special red foil paper that I had and made about a dozen cranes to grace my Christmas tree. I nestled them in the boughs and loved the way they looked incorporating a bit of the Japanese culture from where I was living with my personal tradition of having a Christmas tree. 

When I moved back to the US I didn't have unlimited space to ship things back so I got rid of my little Christmas tree but I did save the menagerie of orizuru that I had made for the tree. While my Japanese Christmas tree wasn't the largest or most beautiful of the trees that I have had over the years it is definitely one that has a special place in my heart.

Monday
Dec162013

Fresh Coat of Paint for the House (Plus New Gutters!)

When I first got my house back in 2007 one of the first things I did was replace the rot on the house and get some paint on the exterior. The back had never been painted when the wood clapboard had been replaced and I was afraid of further rot if it didn't get painted before the winter came. It was pretty scary! Here's what it looked like when I bought it.

At the time I originally painted the house one of my neighbor's homes was white and one was blue so I thought that yellow would be a nice color so I picked a scheme with Valspar's Oatlands Yellow for the house with Chef White for the trim. For some added a color I painted the accent a teal color with a bright turquoise for the ceiling of the porch. Here are how things looked a few years ago after painting.

Fast forward a few more years and things have been looking a little sad. The paint had faded and some issues with the gutters caused some rot that needed to be fixed. It was time to repaint and give the exterior a little TLC.

First up I needed to figure out my new house colors. In general I loved the color scheme that I had but I wanted some deeper, more vibrant shades of what I already had. I picked up a few test colors from the paint store and tried them out on the garage.

On the left was Benjamin Moore's Concord Ivory and the right was Marblehead Gold. Based on swatches I had been leaning toward the Concord Ivory but once it was on the garage I knew the vibrancy of Marblehead Gold was the winner. In the end to go with the Marblehead Gold on the siding I choose Soft Chamois for the trim and Narragasett Green for an accent. I also decided that to paint the concrete foundation a dark grey color, Cromwell Gray. For the porch ceiling Frank really didn't like the bright turquoise that I had originally painted it since he thought it was a bit feminine so I chose a more subdued dusky color with Aegean Teal.

Time was running out fast to get things finished before the cold weather hit so Frank and I decided to hire a local painter to complete the wood repairs and paint. We chose the painter that we did because he was going to sand by hand and paint with a brush which would be more gentle on our wood siding and be in keeping with the period of our 1800s house. He also painted our neighbor's house and did a beautiful job, plus he gave us a great quote for the job.

First up our painter sanded and primed all the spots with loose paint.

Our painter started by painting the front of the garage so we could make sure that we liked everything before he continued. Here's a shot of the corner so you can see the old and new colors together. Needless to say we loved the difference.

As time went by and more and more paint went up we knew we had made a great decision about not only the colors but also our painter.

After the painting on the house was complete our painter painted the concrete foundation. Below is a picture before and then after the foundation was painted. As a side note this access door was used to bring produce into the basement when the side wing of the house was a local grocery store.

With the painting wrapped up at the beginning of November the gutters needed to be addressed. Not only were they undersized but they had seams, didn't slope properly toward the downspouts and had unneeded bends all of which you can see in the picture below.

Frank got a few quotes for seamless 6" gutters with 4" downspouts before we settled on a contractor. Amazingly they got installed at the end of November in just one day.

In the few weeks since then I haven't had much of a chance to get some pictures of the house during daylight hours (that whole engineer thing takes up a heck of a lot of my time) until now when we have seven inches of snow on the ground. Here is what it looks like today.

I love how the colors turned out and it really gives the house a facelift. My favorite part is how vibrant the new yellow is. In the past the pale yellow really looked bleak in the winter but this yellow is so bright and cheerful in the snow. Nothing exemplifies this more than the way the garage looks in the snow filled back yard.

I think Frank's favorite part is the new porch ceiling color since he absolutely hated the bright turquoise (which I loved!) that I had painted it before.

This project wraps up our outdoor projects for the season, but upcoming I would like to add shutters to the house, a wood fence to replace the chain link one in our backyard plus we really need to stain the pergola. To 2014!

Tuesday
Dec102013

Beginning the Master Bedroom Closet Makeover

Since we got married and Frank moved in with me this summer he has been hanging up his clothes on a standing clothes rack in the bedroom. Originally our plan was to use a beautiful antique armoire to convert into a closet for him. It is enormous so we checked the measurements for everything to make sure it could get through our front door, the bedroom door and fit in the bedroom itself. What we didn't account for was the headroom in the stairway which is just a smudge too short.

So apart from figuring out a long term solution for the armoire on the first floor Frank needs some place to hang his clothes which is bringing about this closet makeover.

The old closet system doesn't work for a few reasons. Originally it had only one bar on each side with the shelves above. The shelves are largely useless and just gather my junk so I want to hang the rods higher. I hung a second rod on one side of the closet but because the top rod wasn't very high it works for my clothes but not for Frank who is a foot taller than me. All in all if this closet was going to work for us I needed to completely rework the organization to maximize the space for both of us.

To start I set about cleaning out the closet (no easy feat with my pack rat ways!) and then demoing the existing organizers last weekend. I was as careful as I could be but the walls were pretty scuffed up and had a number of holes in the walls from where the old shelf supports were attached.

Using a putty knife, I filled all of the holes plus a few small dents the closet had acquired with some joint compound. After it had dried I applied another thin layer and then sanded everything smooth once it was dry.

While I was at it I wanted to paint the trim white so a little prep work was required there as well. I applied a bead of paintable, sandable caulk in all of the gaps and then smoothed it with my finger.

If you don't use a caulk gun very often one thing I'll mention is that right after you are done applying caulk hit the release on the back otherwise when you set it down it will slowly keep oozing out. I learned my lesson about this several years ago with a construction adhesive mishap. In case you are wondering construction adhesive is very tough to get off your hands and will turn them black. It made for a slightly awkward few days at work.

Anyway, back to the closet! With a coat of primer and two coats of Benjamin Moore's Simply White on the trim followed by two coats of Valspar's Oxygen White on the walls my closet was a fresh blank slate.

Next up I have some fun plans for the ceiling and closet light plus I'm going to build organizers that maximize the space for our needs. I can't wait to get the clothes back in the closet!

Thursday
Dec052013

Michigan Tailgate Cake: Beat Ohio

Saturday was the last Michigan football game of the regular season playing against arch rivals, OSU. For the tailgate cake I baked a chocolate cake and iced it with buttercream icing that I tinted maize. I kept things simple and decided to decorate the top with the phase "Beat Ohio".

To make the words I rolled out some blue marshmallow fondant and traced around a bowl to make a circle just smaller than the cake. I then cut away a line across the middle to make the top and bottom lines for the words. I then trimmed away three vertical lines leaving me with eight blocks for my letters. I then cut each block into a letter to spell out "Beat Ohio". I finished up the cake by transferring the fondant letters onto the cake and piping a border of blue stars along the base of the cake.

Kickoff for the game was a noon so we had a short but fun tailgate. As is tradition for the last home tailgate of the year we ate filet mignon provided by Gus and grilled by Frank. Frank also made an awesome crab bearnaise to accompany the steaks.

For the week prior to the game everyone had Michigan pegged as a huge underdog. Ohio was undefeated and ranked #3 in the country while Michigan's season had been lackluster. The game, however, ended up being very exciting as opposed to the blowout that had been predicted. Michigan scored first and at the half it was tied 21-21. Things looked a bit bleak in the second half when Michigan was down by 14 but they rallied and with less than a minute left they scored a touchdown to bring the score to 41-42. Michigan went for a two point conversion but it was intercepted basically ending the game. It was a great game, but I wish that things had worked out a little better for Michigan.

My Duke Blue Devils had an exciting day on Saturday, beating rivals UNC. The Duke-UNC game was at the same time as Michigan-OSU so the whole game I was continuously checking my phone for Duke updates. With the win Duke ended the regular season with their best record, 10-2, and will head to the ACC Championship game this Saturday against Florida State. Go Blue Devils!

Page 1 ... 2 3 4 5 6 ... 31 Next 10 Entries »