­
Blog - homeandawaywithlisa
Welcome

My name is Lisa and I'm a crafty girl with wanderlust working as an engineer by day. My blog chronicles projects in my home as well as pictures and stories from my travels.

Search


Instagram

Blog Index
The journal that this archive was targeting has been deleted. Please update your configuration.
Navigation

Entries in Home (303)

Friday
Jul252014

A Few Kitchen Updates

It has been a long time since I posted anything about my kitchen and since over the past few months I've made several changes I thought I would share.

First up was swapping out the vintage red and white enamel topped table that I had been using as a kitchen island. Let me just say that I love that table. I think it is fantastic. Since I stand at a towering 5'2" it is perfect for me as a work space plus it is super cute. My husband, however, had some differing opinions. He's a foot taller than me and it was way too low for him to comfortably use as a prep area in the kitchen, or as he would say the table was designed for munchkins.

Marriage is all about compromise (plus for selfish reasons I love having him make me dinner and thought removing any impediments to that would be in my best interest) so I had planned on building an island after we got married. Unfortunately, I have way more plans than time, so although I still intend to build a fantastic island that Frank will love the reality is that is likely a few years down the road. With that in mind I set about searching for something that would work better for us, but not break the bank.

I had no idea that kitchen islands were so dang expensive. Everything I seemed to like was about $1500 which was way more than I wanted to pay. Eventually I found a black kitchen cart with a stainless steel top on Overstock. At $368.99, it was still more than I would have liked to spend but it was the best option and by far the least expensive of anything I had found and I ended up ordering it in March.

When it arrived while Frank was out of town on a business trip I was excited to put it together and surprise him when he came home. Of course as I started putting it together I discovered that the two locking casters were missing and both side panels were broken. After some frustration I was able to get the replacement parts for the island a week later.  At this point I had become pretty annoyed with the kitchen cart so Frank, who had since returned home, kindly assembled it. 

In the end it has been pretty awesome. It is a great height for Frank to use as a prep space and I still have my lowered baking center to use when I am working on making something. I also like that the black color ties in with the black granite and the stainless top matches the appliances. The only thing I am not a fan of is the weird handles on the drawers. They have a strange cross hatch pattern on them, which is hard to see in the picture. Someday I will swap them out, but that is a minor thing to do down the road.

After we got back from our Scandinavia trip in May, Frank was off to Japan for work. I decided while he was gone that I should paint the kitchen. This is what happens when I am left to my own devices. The color has been a pretty green since I remodeled it when I first bought the house, but I was growing a little tired of the color. Additionally, the green was a little jarring with the macchiato color of the living/dining room that you could see through the pass through.

I wanted something lighter as well as a neutral and settled on Benjamin Moore's Pale Oak. Two coats of paint later and my kitchen was transformed.

With the fresh paint color on the walls there were a few more changes as well. While Frank and I were on our Scandinavian vacation most of the hotels we stayed at had a muesli bar as part of the buffet breakfast. We loved it and decided that we should make our own small version at home. Frank found the jars and filled them up with goodies and I found the wood tray at HomeGoods to stack them on.

The old red, white and green rug that I had been using in front of the sink had seen better days, plus with the new wall color I wanted something different so I replaced it with a hounds tooth check runner that I found at Target.

On the wall next to the window above the baking center I hung another HomeGoods find. I loved the mix of the white wire with the wood slats and rope hanger. On the top shelf I have a little bowl that I picked up at the Grand Bazaar in Istanbul paired with some sake I bought in Japan. The second row has two pestles that I bought at the Chichicastenango Market in Guatemala, my great-grandmother's coffee can, an antique milk bottle that I bought at the Osu Kannon Flea Market my last day living in Japan and a tiny brass spice mill I bought in Turkey. On the bottom sits a hand painted bowl that I bought with Frank when we were in Positano, Italy two years ago. 

Overall I am really happy with the kitchen updates. They aren't the biggest changes but to me it really freshens up the space and makes everything seem so much brighter.

Still on my to do list in here is to sew some cafe curtains for the windows and add a subway tile backsplash, but I really need to finish tiling the downstairs bathroom before I even begin to think about that...

Monday
Jun232014

Creating a Berry Patch Behind the Garage

The small strip of land behind the garage has always been a hot mess. When I bought the house it was a jungle of overgrown black raspberries with poison ivy lurking along with other weeds. I had tried to unsuccessfully clear it out with nothing but a bad case of poison ivy for my troubles and ended up hiring someone to do it for me. Of course, the next summer everything was back with a vengeance. Since I didn't learn my lesson the first time I tried tackling it myself with the same itchy results and ended up hiring to have it cleared out again. Unfortunately, I wasn't so clear about the fact the black raspberries were keepers and to my dismay it was all wiped out. Last summer Frank put several bags of mulch down to keep the weeds and poison ivy at bay but this year I wanted to have a more permanent solution as well as plant some berries again.

We started by cleaning out all of the random things that had been stashed behind the garage and getting rid of the few weeds that had popped up again. Frank rototilled the dirt and then I spread it with a rake to level things out.

Next, I evenly spaced out our berry plants (4 raspberry and 4 blackberry) along the garage and planted them.

To define the berry patch border we decided to use black composite edging. I rolled it out on the patio, weighing it down with bricks to flatten it. Once we were ready to install it, I attached a stake to the edging every four feet.

Frank dug a shallow ditch where we wanted to place the edging and then I put the edging in place, hammering in the stakes and backfilling and tamping the soil down around it.

I definitely wanted to keep weeds at bay so I spread a bunch of mulch around the berries and laid out a sheet of landscape fabric on the pathway we were creating.

The biggest part of the project was filling in the path with nearly a square yard of marble rocks. Frank used a wheelbarrow to move all of the rock and then after he dumped it I spread it out with a rake. It was pretty exhausting but I love how it looks.

We finished off the project by putting down some more mulch along the fence and laying down a piece of sod. I think it looks great and in the three weeks since we did this it has remained gloriously weed and poison ivy free. The plants have been growing and some of the blackberry bushes have several young berries on them. I'm not expecting many berries this year but I have high hopes for the years to come.


Wednesday
Jun182014

Tiling Progress in Downstairs Bathroom 

Between work and traveling, finding time to work on the bathroom has been tough, but I am inching along and made some headway on tiling the shower surround. I last left off with taping the cement board joints and setting the first two rows of tile. Since then I broke out my tile saw and pretty quickly I had set six more rows of subway tile plus the black liner bar.

At this point things got a little more complicated as I had to tile around the niche and had to modify my tile spacers to work with the chair rail tile. The chair rail tile is dimensional so the flat spacers wouldn't fit. I used some wire snips to trim the arcs off of one side and then put them in perpendicularly under the chair rail tile. I used the snipped off part between top of the chair rail and the next course of subway tile. Whatever works, right?

The other complicating factor was that the chair rail is just a smidgen under 6" so I couldn't line it up with the subway tile. I ended up offsetting it a bit from the subway tile to disguise the mismatch in length. 

I used painter's tape to keep the row that spanned the top of the niche in place since it had no support below. I had to work quickly at this point before the thinset set up too much make small adjustments in order to make sure that the rows that stacked up on the right side aligned with the row over the niche.

Next, I tiled the back of the niche, making sure to line it up with the surrounding tile.

At this point I had used up the batch of thinset that I had mixed up so I decided to pre-cut some of the tile that I would need for the rest of the niche before I mixed up the next batch. I wanted to trim out the niche with some bullnose tile but I didn't like the thick width that was available so I cut down my own from some tile that I had with a bullnose edge along the top.

I set the rip guide on my saw to the width of the black liner bar tiles that I was using and cut a bunch of thin bullnose pieces. It is hard to get the rip guide in the exact same spot again so I always cut a few more pieces than I will need just in case.

I also pre-cut the mitred corners for the niche before I mixed up the next batch of the thinset. To get the 45 degree angle I butted my tile up against my small speed square. When I am doing something like this I like to make the mitre cut first and then I cut the squared end down as I fit the piece when I am setting the tile.

I feel like at this point I should mention that I absolutely love my tile saw. I bought it used from Craigslist for $100 (a strange story in itself) back when I was tiling the master bedroom shower and it has been worth every penny and more. I couldn't even imagine doing this with tile nippers, plus I feel like everyone should own their own wet saw.

Back to the tiling, I mixed up some more thinset and tiled the top, bottom and sides of the niche trimming it all out with the thin bullnose I had cut. Again I used painters tape to hold the pieces without support in place. By the time I had the niche finished the row above the niche had set enough that I could remove the painter's tape that was supporting it and finish tiling to the ceiling.

I'm not going to lie, the niche took me a while with all of the cuts and it isn't perfect, but I really like it and think it was worth the effort. With the niche out of the way I don't have a lot of complicated cuts left so tiling the side of the shower and wainscoting should go fairly quickly. I can't wait to get the tiling done!

For other related posts about this bathroom renovation check out the history of my downstairs bathroomfixtures for my bathroom renovationplumbing in the downstairs bathroominstalling the floor tile underlaymentinsulating the ceiling, installing the vapor barrier for the shower, installing drywall and cement board, tiling a vintage mosaic border, mudding, taping, sanding and painting and taping the cement board joints. If you are interested in my completed master bathroom renovation check out master bathroom renovation recap. 

Monday
Jun092014

Monogram Baby Blanket

Today I thought that I would share a baby blanket that I made for my friend's little guy a few months back. His room is car themed so I when I found license plate flannel at the fabric store I knew that it would be perfect. I bought some plush red minky fabric to pair with it for the front of the blanket and I was ready to go.

I wanted to add a little bit of interest to the front so I decided to add a monogram to the front using felt. I created a design on the computer (a circle with his initials in it), printed it on the computer and cut it out of white and black felt. 

I cut down the red fabric to the size that I wanted and then worked on the monogram in the bottom right corner. I sewed down the white circle first and then layered the black ring and letters over it attaching it with a tiny hand stitch (like I did with these scarves).

I wanted to use the license plate flannel for both the backing and binding of the blanket so I cut it to be 3" wider and 3" longer than the red fabric.

I spread out the license plate flannel face down and then layered the red fabric over it face up, centered so that there was a 1-1/2" border of the license plate flannel around the perimeter of the red fabric. 

I folded the license plate flannel so that the edge touched the edge of the red fabric and then folded it over again, pinning it in place to make a 3/4" binding.

At the corners I trimmed away a little extra flannel and then folded the licence plate flannel so that it would create a mitered corner and pinned it in place.

I sewed the binding down and the blanket was done. I think that the blanket turned out cute and is definitely warm and snuggly. Perfect for such a sweet little man!

Thursday
May292014

Setting the First Wall Tile in the Bathroom

On Monday I finally got to begin setting the wall tile for the bathroom. But before I began tiling I had to tape all of the cement board joints. First I mixed up a batch of thinset using the same type that I'll be using for tiling later. 

I filled all of the joints with thinset, embedded 2" alkali-resistant glass fiber tape in the thinset and then leveled everything smooth. The alkalinity of the thinset can cause regular fiber mesh tape to deteriorate over time so it is important to use alkali-resistant type.

Once I had finished all of the joints I had some thinset left over from the batch I mixed up so I decided to start setting tile. Setting the first tile properly is critical since that will determine the rest of your tile layout. If the first tile isn't level and centered the whole installation will be off.

I wanted my chair rail tile to line up with the bottom of my shower niche so I applied some thinset to the center of the wall with my 1/4" square notch trowel. Starting from where I wanted the chair rail tile I worked my way down setting my tiles with 1/16" spacers until I got to my second to the bottom tile.

I then took a 1x4 cut to the width of the shower, butted it up to the bottom tile and screwed it into the wall at the center point. Setting my 4' level on top of the board I used the center screw as a pivot point and adjusted the board.

Once I had the board level I screwed it to the wall on the ends to secure it and pulled down the tiles from the wall making sure to scrape off all the thinset from the cement board. This gave me a clean slate with a ledger board in place to make sure that my chair rail tiles will line up where I want them. I'm sure a professional would have a better way of doing this but it took me less than ten minutes and I was afraid that if I just measured down I might be slightly off and that would have driven me nuts.

I troweled some thinset on the cement board, measured the midpoint and carefully set the first tile. From that tile I worked my way out setting the first row with 1/16" spacers. I moved up to the second row, carefully measuring to make sure that it was offset 3" from the row below and set the tiles from the inside out. At this point I was out of thinset so I called it a day. I know it is only two courses, but it is nice to have just a little bit of tile up on the wall. Hopefully I can fit in some time to work on it again this weekend.

For other related posts about this bathroom renovation check out the history of my downstairs bathroomfixtures for my bathroom renovationplumbing in the downstairs bathroominstalling the floor tile underlaymentinsulating the ceiling, installing the vapor barrier for the shower, installing drywall and cement board, tiling a vintage mosaic border and mudding, taping, sanding and painting. If you are interested in my completed master bathroom renovation check out master bathroom renovation recap. 

Tuesday
May272014

Mudding, Taping, Sanding and Painting!

Of all the basic remodeling jobs, finishing drywall is my least favorite. Covering screws and flat seams aren't so bad, but corners are the worst for me and unfortunately, even though my bathroom is small it has a lot of them at strange angles because of the sloped ceiling.

I had done my initial mudding and taping a while back but had been procrastinating about finishing everything up. Since I had a four day weekend from work I used two of the days to mud, sand and repeat. Because the spot where the sloped ceiling meets wall with the door is less than 90 degrees, my small angled sanding sponge came in handy to get in the tight spot for a nice finish.

After several rounds of mudding and sanding I finally had things smooth and to the point where I could finally move on.

I used my shop vac to clean up all the sanding dust and wiped down the walls and ceiling before putting on a coat of tinted primer.

Two coats of paint later and the ceiling and walls were all a nice dark charcoal grey (Valspar's Mark Twain Gray Brick). To help disguise the low ceilings I painted the ceiling and walls the same color and I thought the almost black color would be nice to balance out all of the white tile and woodwork that will eventually be in the room.

Next up is tiling the shower surround, which I already got started with on Monday. Despite having a hard time finding time to get this bathroom done I can't wait to get it finished!

For other related posts about this bathroom renovation check out the history of my downstairs bathroomfixtures for my bathroom renovationplumbing in the downstairs bathroominstalling the floor tile underlaymentinsulating the ceiling, installing the vapor barrier for the shower, installing drywall and cement board and tiling a vintage mosaic border. If you are interested in my completed master bathroom renovation check out master bathroom renovation recap.

Wednesday
May142014

Curtains for the Master Bedroom

After rearranging the master bedroom to fit in our new king size bed I wanted to add some new curtains to replace my roman shades. Being a 140+ year old house, the windows are a bit of a crazy situation. The windows on the front of the house sit a little lower down then the ones on the sides plus one of the side windows is a larger replacement window I had to install to bring the house up to fire code for egress. I thought by using some shades and curtains I could disguise the mismatch of windows in the room.

After a little hunting around I found some pretty steel and ivory canvas curtains from West Elm marked down from $44 to $19.99 and jumped on buying them. I then bought allen + roth natural fiber roman shades and Threshold knob drapery rods in brushed nickel from Target. 

I bought 72" length shades so that I could hang them right under the beams in the room. This not only makes the windows seem taller but also helps mask fact the the windows on the front of the house are lower than the ones on the side.

Next I hung the curtains snugly under the beams. It is really amazing how these two windows which are the same size can look so different with a change of window treatment. I just love how the window on the right appears so much larger.

The new window treatments make the room seem so much larger and taller plus it makes the crazy window situation appear much more uniform. I am so happy with how it all turned out.

Pulling the curtains a little closer together on the window along the side of the bed disguises the fact that it is over a foot wider than the other windows.

Next up I want to add some art over my dresser in the corner. It is going to be a little tough since the dresser is on an angle but I have an idea that I think might work.

Have you been doing any refreshes in your home this spring?

Monday
Apr142014

Rearranging the Master Bedroom

After I moved back to the US from living in Japan I set up my bedroom with my bed between the windows. I liked the setup so I never changed much in the intervening years.

When Frank and I got married and he moved in things needed to change. While my full size bed was fine for my life as a single lady Frank is a foot taller than me and there was no way it was going to work anymore. Since we also needed more storage space for Frank's clothing I set about looking for a king size bed frame with storage drawers.

I spent a little while hunting around for something just right. Some frames had drawers only on the sides or only on the ends but I wanted both. I also wanted something that would coordinate well with the antique dressers I inherited from my great grandmother.

Finally I found the Abbott Storage Bed at Art Van. It had a classic style with six deep drawers plus the mahogany stain was just the right color.

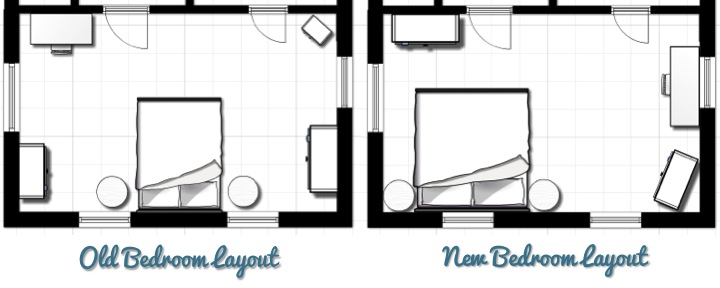
Purchasing the king size bed necessitated rearranging the layout of the room. The full size bed had barely fit between the two windows at the front of the house and the king bed looked quite awkward in that spot. After a combination of sketching a few things out and moving things around I came up with a new room layout that I liked.

I started by putting the new king bed centered under one of the windows which opened up the other side of the room. Although I like the night stands that I have, they get in the way of opening the drawers closest to the headboard so at some point I would like to replace them with something wall mounted.

At the foot of the bed I put my one of my great-grandmother's dressers. I plan to remove the mirror from the dresser (it is simply screwed on with brace plates in the back) and mount the TV to the wall in the future.

On the other side of the room I centered Frank's great-grandmother's desk (a new addition to the room) under a window. I angled the second of my great-grandmother's dressers into the corner of the room since it looked too cramped flat against the wall. I love that we have furniture from both my great-grandmother as well as Frank's in our bedroom.

With the furniture layout worked out for the room I have a bunch of small things that I want to do to pull together the room:

- Hang new blinds and curtains
- Hang some art on the walls
- Get an area rug
- Remove the mirror on the dresser and mount the TV on the wall
- Build shelf night stands 

So far Frank and I have loved our new bed and the storage has been a wonderful addition to our room. I'm excited to get the room all organized and finished.

Monday
Mar242014

Vintage Mosaic Tile Border For the Downstairs Bathroom 

One of the things that I have been really excited about doing in the downstairs bathroom was the floor tile. Since my house is over 130 years old I wanted to use mosaic tiles to create a vintage look with a border around the perimeter of the room. I looked at bunch of images for inspiration and found that American Restoration Tile was a particularly great resource. I love the look of the Greek key border, but since the area I have to tile is small I needed a smaller border and settled on creating a square jogging border design.

I bought one sheet each of 1"x1" black mosaic tile and 1"x1" white mosaic tile and tested the pattern to be sure that I liked it. I was sold so I went back to the store and bought enough sheets for the project.

To get started I used a pair of scissors to cut through the mesh backing of the mosaic sheets to create some strips of the black that were two tiles wide and one tile wide and then some strips of the white tile that were one tile wide. I also peeled a bunch of the tiles off from the mesh backing to use to piece together the jogging square.

After I did a dry fit to confirm everything I used a 3/16" X 5/32" V-notch trowel to spread thinset in sections along the perimeter of the floor. This was my first time tiling with mosaics and I really had to be careful with the amount of thinset I was using to make sure that it wouldn't squeeze up between the tiles.

I laid a strip two wide strip of black tiles against the wall followed by a strip of white. I then used the individual tiles to create the jogging square and then added another strip of white and black. I thought a while about how to handle the corners and decided that I liked a simple square the best. There weren't any spacers that I could find that matched up with the spacing on from the mesh very well so I used a combination of eyeballing and a straight edge to keep my spacing even as I went along.

After I finished the border I went back with my 5-in-1 Painter's Multi Tool to scrape up the extra thinset so that I would have a flat, even surface for when I go back to add my field tile.

I had two extra columns in the width of the room and one extra in the length of the room so I had to adjust the pattern a bit in the corners. The most visible corner is the one in front of the tub across from the toilet (in the bottom right corner of the below picture) so I kept that one with the proper spacing. On the corners that are on the wall with the door I added an extra white column on either side of the corner square. For the remaining corner I added an extra white column next to the square and in the first pattern but it will be behind the toilet so it will be hidden. I wish that it worked out to have the exact number of tiles I needed for an even pattern but overall I think it looks balanced.

I'm really excited with how the border has come together and I am excited to bust out my tile saw and add the hex field tile to the floor.

For other related posts about this bathroom renovation check out the history of my downstairs bathroomfixtures for my bathroom renovationplumbing in the downstairs bathroominstalling the floor tile underlaymentinsulating the ceiling, installing the vapor barrier for the shower and installing drywall and cement board. If you are interested in my completed master bathroom renovation check out master bathroom renovation recap.

Tuesday
Mar112014

Drywall and Cement Board for the Downstairs Bathroom

After a hiatus from working on the downstairs bathroom for a few months I finally got back at it. In the fall I had closed up the floor and installed the underlayment, insulated the ceiling and installed the vapor barrier for the shower but then things got stalled with a busy work schedule and travel.

About a month ago Frank and I drywalled the ceiling with him holding the sheets in place while I screwed them in. It was a bit of a challenge in the tight space but we got it up together.

This past weekend I started closing up the walls in the bathroom, starting with the 1/2" thick cement board on Saturday. Cement board is waterproof making it an ideal substrate for tiling the shower surround.

Cutting cement board is the same as the score and snap method for drywall. Using a carbide cutter and a T-square score the cement board panel a few times making a groove in the cement and cutting through the glass fiber mesh.

Next bend the panel so it snaps along the groove.

Finish by using a utility cutter to cut the glass fiber mesh on the back side.

To install the cement board in the shower surround it is important to use screws that are designed for cement board and are rust and corrosion resistant since it is a wet area. The cement board needs to be installed 1/4" above the tub flange and due to its heaviness I had Frank hold it up for me while I screwed it in to guarantee the gap. It sure is handy to have a husband around...

To make the cutouts for the plumbing I used a carbide tip meant for cement board with my handy dandy cut-out tool. Sometimes Frank jokes that he married me for my power tool collection. I don't blame him.

I wrapped up the shower surround on Saturday and moved on to the rest of the room on Sunday. I'm planning on tiling part way up the wall in the main area of the bathroom. Because that area is outside of the wet zone of the shower I could use drywall under that tile but since I had extra panels of cement board on hand I decided to use cement board.

With the cement board all installed I was ready to finish closing up the walls with drywall. I had only one problem: no 1/2" drywall at home. Normally I would sweet talk Frank into going with me to Lowe's with his truck but he had left for a work trip at noon so I was left to my own devices on this one. 

I took measurements of the cuts I would need, packed my T-square, measuring tape and utility knife in my car and headed off to Lowe's. I bought the two sheets of drywall I needed, rolled it out to the parking lot and then just cut the sheets down to what I needed in the parking lot. With my back seats folded down it barely fit but I got it all in.

I could have waited until Frank came home but he won't be back until Friday night and I didn't want to wait. Plus, being stubborn and independent is part of my charm, right?

By Sunday evening I had all of the drywall on the walls and everything closed up. I was pretty exhausted from the weekend (cement board is heavy!) but so glad that the bathroom is starting to look like a room. Next up is mudding and taping the drywall!

For other related posts about this bathroom renovation check out the history of my downstairs bathroomfixtures for my bathroom renovationplumbing in the downstairs bathroom, installing the floor tile underlaymentinsulating the ceiling and installing the vapor barrier for the shower. If you are interested in my completed master bathroom renovation check out master bathroom renovation recap.