


DIY Bathroom Fan Vent Cover
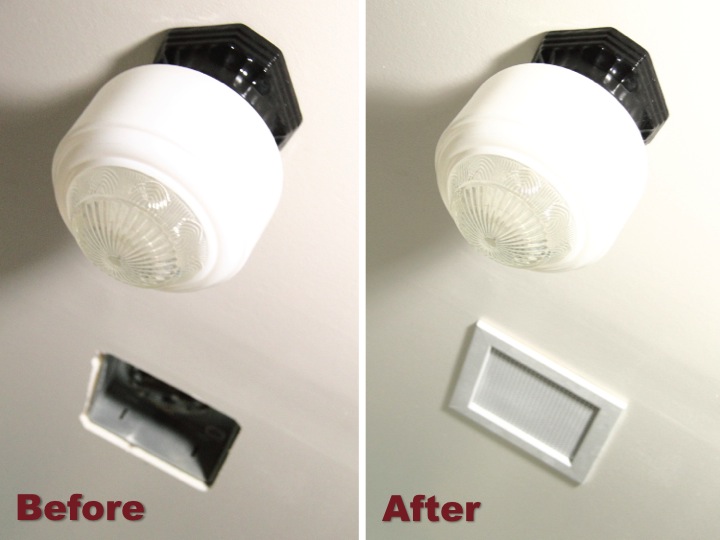
Today I am so excited to share that I finished up my last project in my bathroom: making a vent cover for my bathroom fan. The plastic cover that came with the fan looked cheap and flimsy and really didn't fit in with the vintage style of my bathroom. I searched around to try and find something else that would work but was unsuccessful so I decided that I needed to make something myself. 
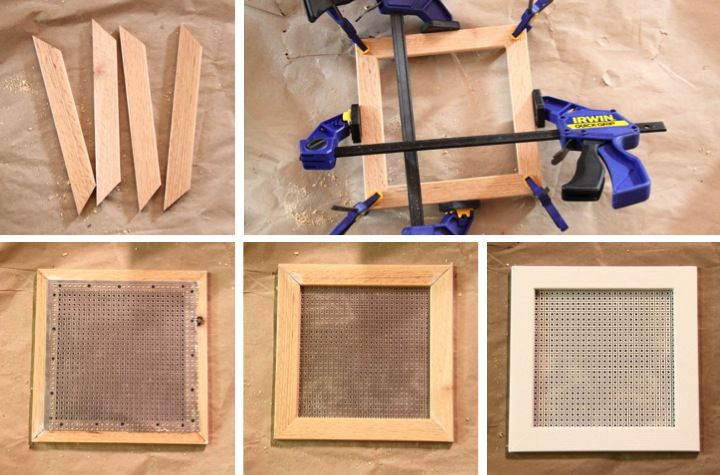
To make the vent cover I found some wood trim 3/8" thick and about 1-1/4" wide with slightly a slightly rounded edge to make the frame. I thought about using some craft wood to make a wood lattice but when I saw this metal with perforated holes resembling a caning pattern I knew it would be perfect.
I mitered the corners of the wood trim, used wood glue to assemble it and then clamped it while it was drying. After the glue was set I cut a piece of the metal with some tin snips and then used 1/4" cut tacks to nail the metal to the back of the frame. After a coat of spray paint primer and two coats of my ceiling paint I hung the cover over my opening.
Having the gaping hole in my bathroom ceiling finally covered up makes me really happy and I am so glad that my bathroom is finally finished up. My goal was to complete everything in a month and by doing a little bit everyday I did it. After I get everything cleaned up I'll post some pictures of the whole room.
Has anyone else finished up a big project recently? Are you in the midst of doing some fun things around the house? I'd love to hear what you are up to to get me motivated for my next project.
If you are interested, check out the rest of my bathroom posts here: Bathroom Blog Posts
 Lisa | 17 Comments | Share Article | Email Article | Print Article
Reader Comments (17)
This is such a good idea! Thanks for sharing--I will be using your idea to cover a big hole that houses our water turnoff.
Thank you, Julie! I'm glad it was helpful to you!
Lisa, you have inspired us to set goals to complete small projects around the house. It has been motivating to see your progress and so well documented and we plan on buying our own kreg jig! We can't wait to see what your March projects will be!
Thank you so much! I'm happy to hear that my projects have been inspiring. A kreg jig is definitely worth the investment in my opinion!
Fabulous idea! How did you attach it to your ceiling?
Kathy- Thank you so much! I just used my brad nailer to tack it to the ceiling.
I love this idea . I think picture frames would work too , if you don't have a saw and wood .
Thank you, Areareare!
Curses! I never thought the vent on my bathroom fan looked bad. I never thought about it in aesthetic terms at all. Aaarrgggh, now I can't rest until I add this project to my endless list.
I'm not sure tacking the cover to the ceiling is a good idea, though. How will you clean the fan blades, which ought to be done once in a while?
The plastic vented cover on my fan has wires that are attached to the fan cover at one end, and fit into slots in the fan housing at the other end. It should be possible to to attach the wires to a home-made cover, and use them in the same way to hold the cover flush to the ceiling. Though since the homemade cover is flat, and the old plastic one is a couple of inches deep, the wires might have to be shortened and rebent.
La la la! I'll just do all that after I finish painting, regrouting, caulking and shelving in the bathroom. La la!
Where did you get the metal grate?
Will the metal rust in a bathroom?
Srudolph- You could just use screws with wood buttons over the holes to make the vent cover more easily removable. I just pul it down once a year to clean the blades and then tack it back up again.
Chana- I got the perforated metal from once of the big box stores. They have a variety of patterns you can buy.
Andrea- I have had the vent cover up for over two years now with no signs of rust so far.
I really like this site. good work.
I am very happy to see this site.
Thanks & Good Luck.
Very nice idea/option for the exhaust cover.....wish I'd found this yesterday when "I" was venting!
Hi Lisa, I love the vent cover for the bathroom. What would you recommend for an apartment heater that stands vertically on the wall and does not work?
Hi, could you tell me where you purchased the wood for the trim? I like that it's slightly rounded at edges. Thanks.